Easy Halloween Mummy Brownies Recipe
Enjoy the spooky sweetness with my Easy Halloween Mummy Brownies Recipe. These chocolatey brownies are transformed into adorable mummies that will surely get you in the Halloween spirit! The’re the perfect kid-friendly treat!
Also, try my super simple Halloween Spider Brownies or easy-to-make Bat Treats! Mummy Rice Krispie Treats are also a Halloween party favorite!
Oh, my! How cute are these mummified little treats!!
I’m a total sucker for fun Halloween treats and recipes, especially if they’re easy Halloween desserts! Every year, I’m swamped with fall sports, so my latest creation is a must-make for Halloween parties and playdates because it’s cute and simple to make ahead. Mummy Fudgy Brownies!
How about you make Halloween-themed Oreo Mummy Pops with Oreo Cookies and Pumpkin Pops this Halloween season? For previous Halloween parties, these 4-ingredient Bat Treats (I made with peanut butter cups) flew in and made an appearance.
When hosting a crowd, I like to serve my no-bake Halloween Dirt Cake!
Why Make This Fun Halloween Brownie Idea
- Easy Halloween Brownies really are fun! Bring a tray of these mummies to a party and watch them disappear.
- It’s easy to decorate brownies. What a fun way to get the kids involved. Once they’re baked, they can decorate them.
- Chocolatey goodness! Our homemade brownie recipe is chewy, gooey, and possibly one of the best brownies you’ll ever eat.

Brownie Recipe
So, here’s the best part: depending on your time, you can either make a pan of homemade brownies (our favorite brownie recipe) or buy a box mix and bake it up!
I use my delicious homemade Dark Chocolate Brownies for this recipe because they are so darn good, and you don’t need a hand mixer! This is what chocolate dreams are made of! Just make sure you cool completely in the pan!
Ingredients
- 1 ⅔ cups 10-oz. pkg. Nestle dark chocolate morsels, divided
- 1 cup granulated sugar
- ⅓ cup butter (cut into pieces)
- 2 tablespoons water
- 2 large eggs
- 1 teaspoon pure vanilla extract
- ¾ cup all-purpose flour
- ¼ teaspoon salt
Instructions
- Preheat the oven to 325º F (163 degrees C). Grease an 8×8-inch baking pan or line it with parchment paper. Set aside ⅓ cup of chocolate morsels.
- Heat 1 ⅓ cups morsels, sugar, butter, and water in a small saucepan over low heat, constantly stirring, until chocolate and butter are melted.
- Pour into a large mixing bowl. Cool slightly. Stir in eggs, one at a time, with a whisk until blended. Stir in vanilla extract.
- Add the flour and salt; mix well with a wooden spoon. Stir in the remaining ⅓ cup morsels. Pour the brownie batter into the prepared pan.
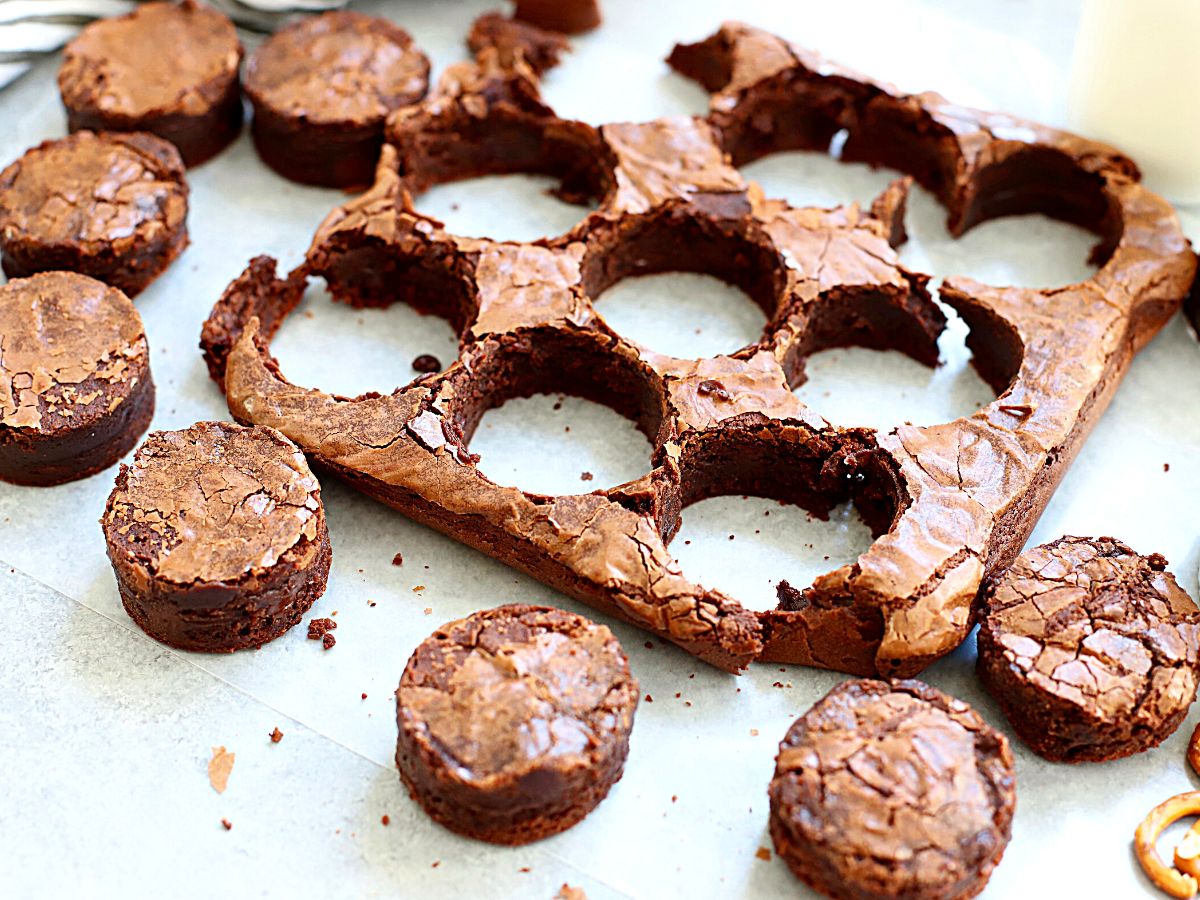
- Bake for 30 to 35 minutes or until the wooden pick inserted in the center comes out slightly sticky. Cool completely in the pan on a wire rack. Cut into circles.
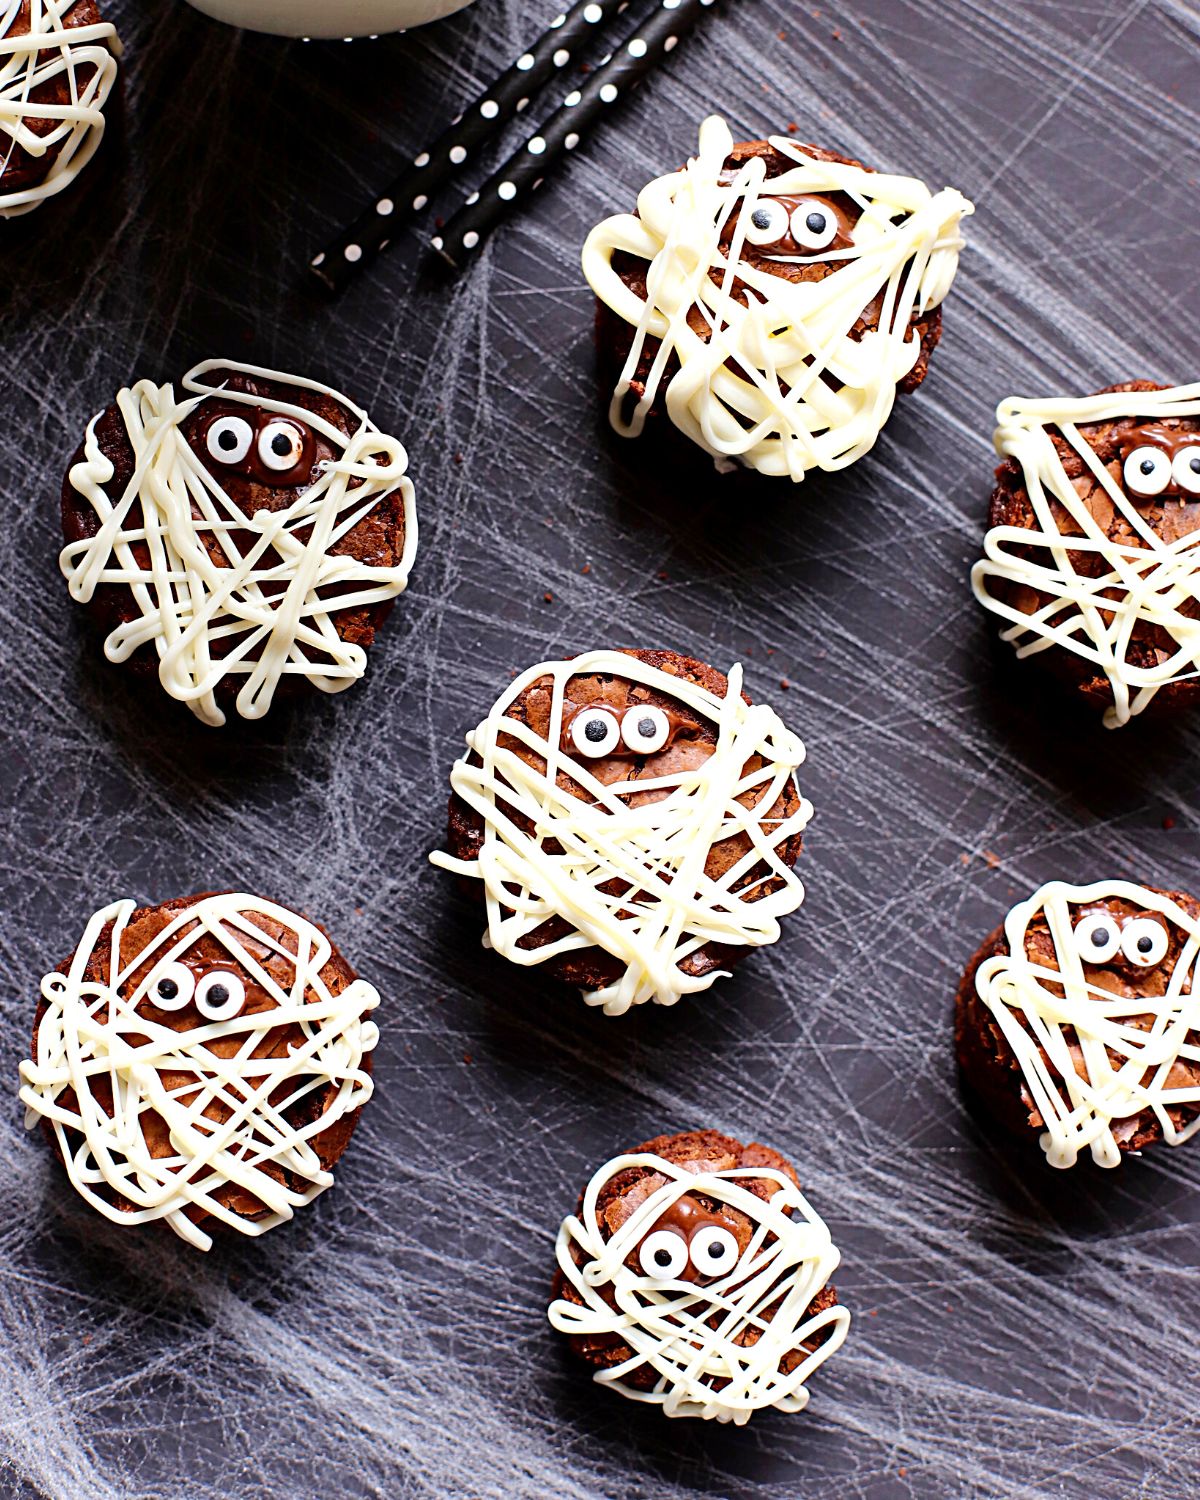
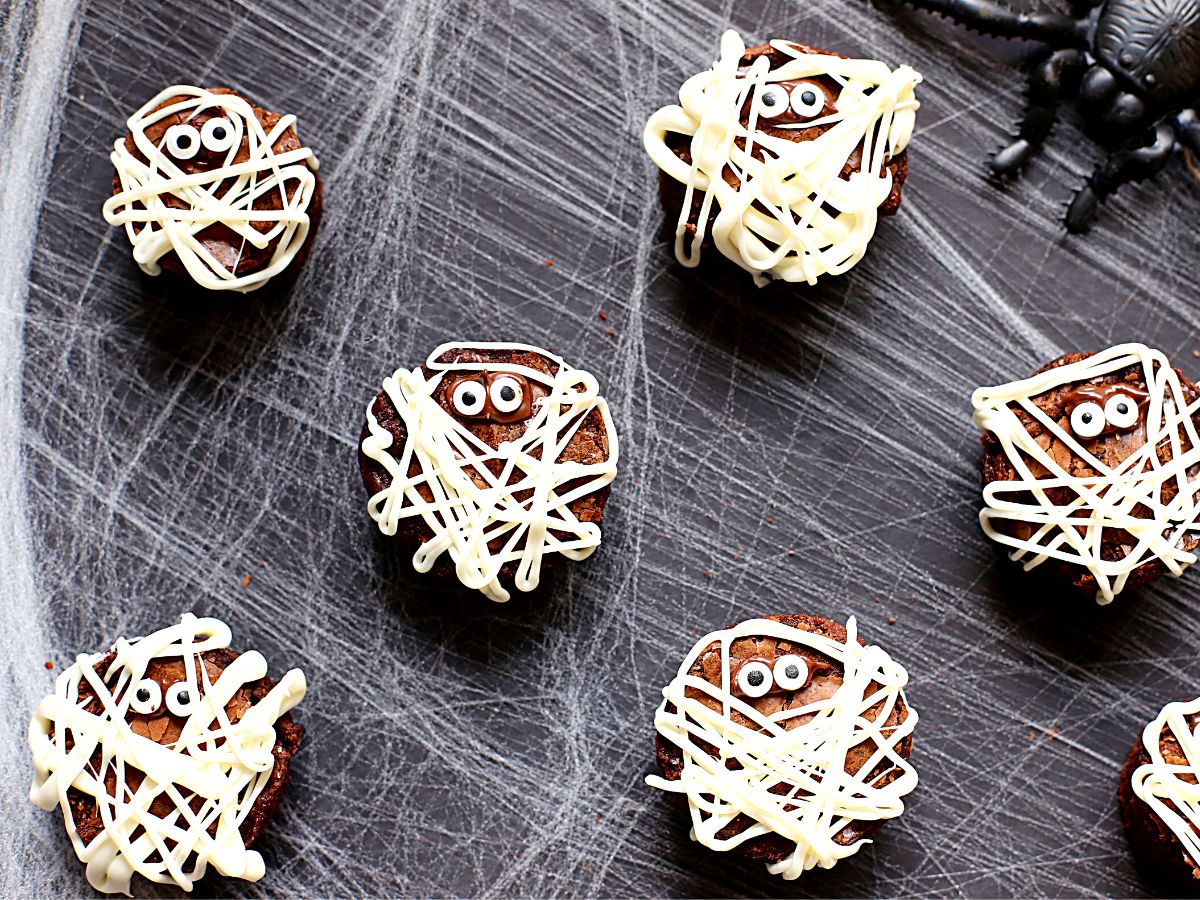
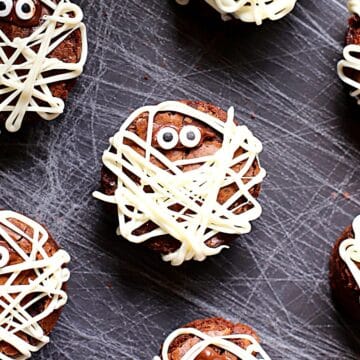
How to Make Mummy Brownies
1. CUT CIRCLES. Once your brownies are baked and cooled, cut brownies into circles with a biscuit cutter. You will likely get (9) 1 1/2 inch circles from an 8×8 pan.
RECIPE NOTE: you can also make your brownies in a cupcake pan so the circles are formed while baking.
You need just a couple more ingredients, and your Mummy Brownies come together easily. Googly eyes are our go-to way of bringing life to a cute little dessert.
Look what they do for these Oreo Mummy Pops.
2. ATTACH EYEBALLS. The easiest way to affix the eyeballs on your spooky-eyed Halloween brownies is to melt some chocolate chips, put a small dab on the back, and place them on the brownies. Once they harden, the eyes stay put.
For reference, place your eyes in the center near the top of your brownie.
3. MAKE BANDAGES. Now, it’s time to get mummified! Melt your white chocolate chips or candy melts in the microwave until they are soft, stirring easily.
PRO TIP: One of the best kitchen hacks is to place your melted chocolate in a small Ziploc baggie and snip a small piece of one corner off. It magically becomes a piping bag!
Now, pipe the chocolate over the top of the brownies with a zig-zag motion.
How to Make Mummy Bandages on Brownies
Once you fill your baggie with chocolate and the end snipped off, make a criss-cross pattern on the brownie to make “bandages” for the mummy.
Make sure you don’t cover the candy eyes. You can put as many as you’d like, but leave a little room between them so they look like bandages. Let your spooky dessert cool and harden, and they are ready to scare up a good time!
Expert Tips & Tricks
This post contains affiliate links. Disclosure policy here.
- MUMMY BANDAGES. You can make the mummy bandages using candy melts, white chocolate chips, or cream cheese frosting. All are frighteningly dee-licious!
- Reader suggestion: Bake your brownies in a cupcake pan so you don’t have to cut them out or cut them into rectangles.
- For a fun twist, stir orange or green food coloring into white chocolate before piping on brownies for colorful mummies!
- Because cutting a circle is hard, we recommend using a round biscuit cutter. The thick brownies come out easily and perfectly round. We use a 1.5-inch cutter.
- Our recipe makes an 8×8 pan of Brownies (9 Mummy Brownies). If you want more mummies, double the batch or use a mix/recipe that yields more.
- Candy Eyeballs are my go-to items for cute desserts! You can find them in the baking aisle of the grocery store or online.
Gluten-Free option
- If you want to make your Mummy Brownies gluten-free, either use a gluten-free brownies mix or try this homemade recipe from The Toasted Pine Nut.
How to store
- Cut and “bandaged” Mummy Brownies can be stored in an airtight container at room temperature for up to 5 days.
- You can freeze your Brownie Mummies. However, we recommend flash-freezing them (freezing them individually on a cookie sheet) and then putting them in an airtight container with parchment paper in between. They will keep for about three months. Thaw overnight on the counter.
More Halloween Brownie Recipes
Here are a few more clever Halloween Brownie Ideas.
Here are some great ideas for leftover Halloween Candy.

Recipe FAQs
Since cutting a circle with a knife is hard, to get perfectly round mummies, we recommend using a 1.5-inch round biscuit cutter.
Yes, you can make mummy brownies square or rectangle if you’d like.
More Halloween Dessert Recipes
Love this Mummy Brownie Recipe? Please leave a 5 ⭐️⭐️⭐️⭐️⭐️ star rating in the recipe card below ⬇️ and/or a review in the comment section further down.
Hungry for more? FOLLOW US FACEBOOK, X, INSTAGRAM, and PINTEREST to see more delicious food & home tips!
Halloween Mummy Brownie Recipe
Ingredients
- 1 pan of baked brownies, 8×8 pan
- ½ cup white chocolate chips or candy melts, melted
- 18 candy eyeballs
Supplies
- biscuit cutter
- toothpick
- plastic baggie
Equipment
- plastic baggie
- cookie or biscuit cutter
- toothpick
Instructions
- Use a biscuit or cookie cutter to cut 9 round “bodies” from your baked and cooled brownies. Place on wax paper or a serving tray.
- Melt white chocolate chips in the microwave. Place a small amount of melted chocolate on a toothpick and dab on the backside of each candy eyeball to create a glue. Affix 2 eyes on the center, the top side of each brownie.
- Place the remaining chocolate in a small plastic baggie and snip a small piece off one corner. Pipe white chocolate onto brownies in a criss-cross pattern avoiding the eyes to form the “bandages.” Let cool.
- Serve the brownie bites immediately or keep them in an airtight container for up to 5 days.


could you use muffin tins instead to avoid the wasted brownies or would those be too big?
Yes, using a muffin tin will also work. Other readers have suggested that it works.
We had so much fun making these easy treats! We will whipping up another batch for the Halloween get together!
They are absolutely perfect for Halloween get-togethers! Thanks for stopping by!
These are so adorable and fun! I’m so excited to make this recipe with my kids!
These make kids so happy! They are a fun activity to make as a family, Beth. Enjoy!
What a fun & easy way to make a delicious Halloween treat! They are always a hit with the kids!
Definitely, a Halloween treat that kids devour! Enjoy Natalie!
These are such a cute – err, I mean, spooky – Halloween treat! My kids will love helping to decorate them as much as they will eat them!
these are so cute and perfect for Halloween!
These are adorable. It’s amazing how cute the candy eyes are.
As always you did a spectacular, delicious job on these Erin!! 🙂