Halloween Mummy Rice Krispies Treats
This Halloween Rice Krispie Treat idea is a must-make! It’s easy and fun for kids of all ages to put together! No-Bake, Mummy Rice Krispies Treats are perfect for your Halloween bash or class parties.
More festive Halloween treat ideas include 4-Ingredient Bat Bites, easy Mummy Pretzels, yummy Mummy Brownies, and Mummy Oreo Pops.
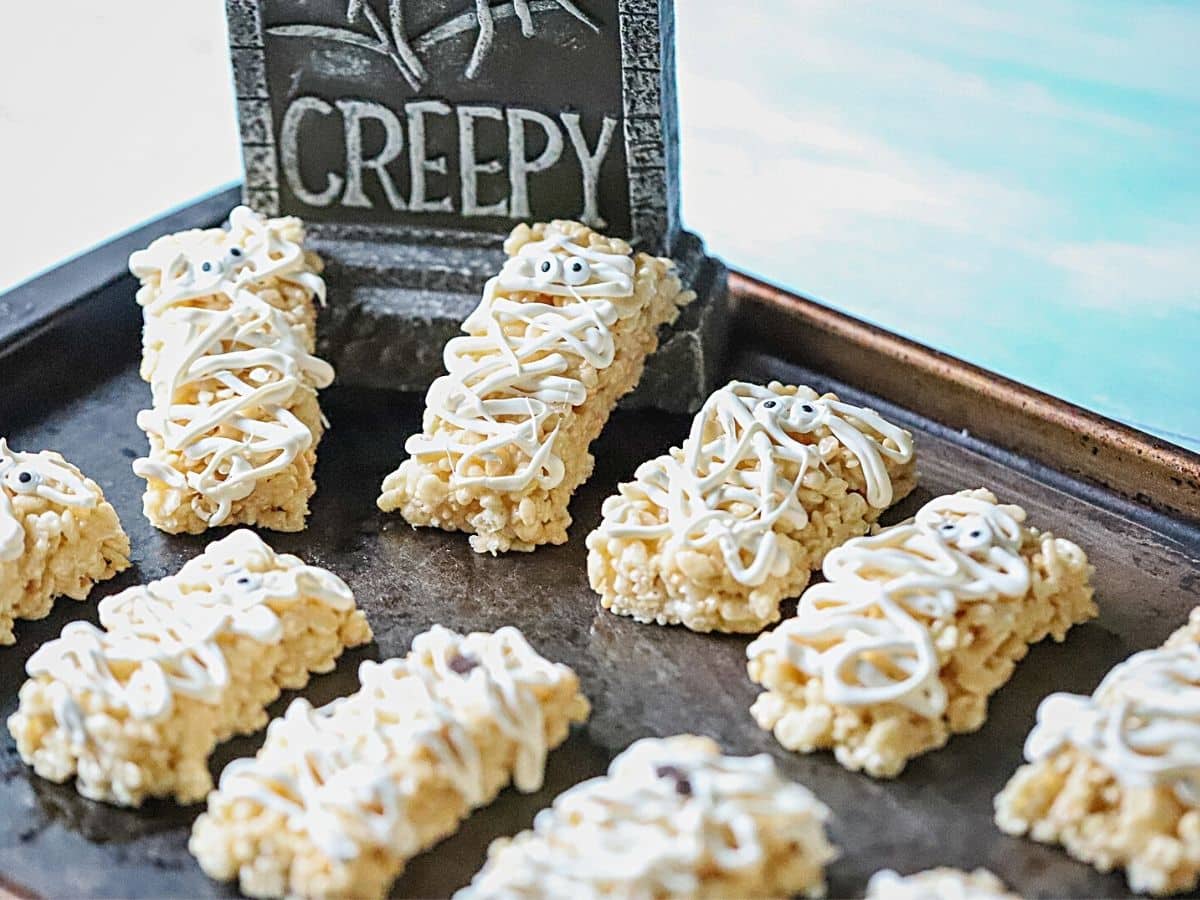
It’s that spooky season when ghosts, goblins, and mummies come out to play! With all the hustle and bustle of fall, I love whipping up Easy Halloween Treats. This year, I came up with a delightful idea: scrumptious 5-ingredient Rice Krispie Mummies. These tasty little mummies are the perfect little Halloween treat!
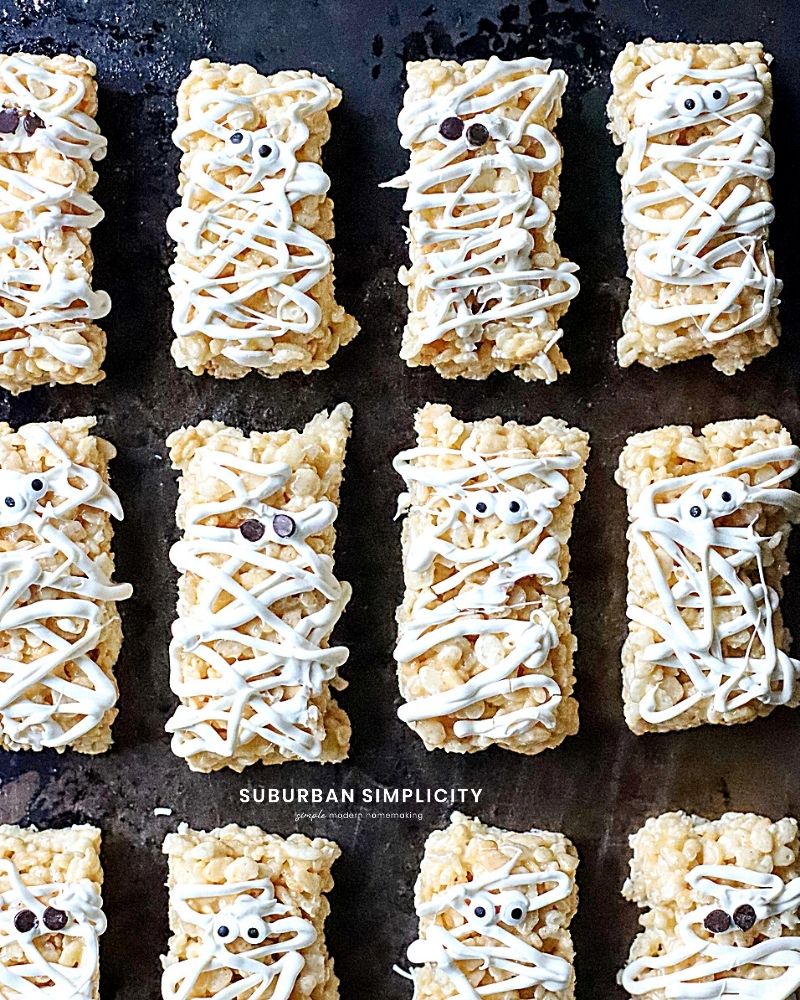
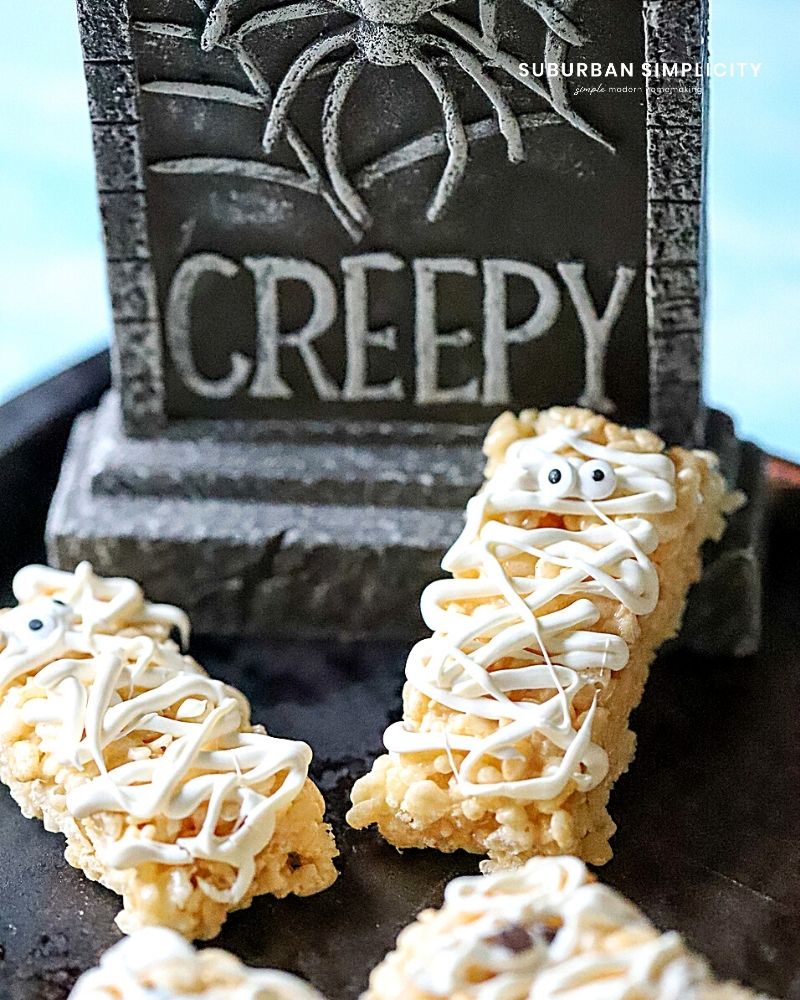
Classic Rice Krispie Treats are bandaged in white chocolate and given cute googly eyes to become the easiest Halloween Rice Krispie Treat Recipe.
This no-bake mummy dessert is such a fun way to celebrate the season! Just like our Patriotic Rice Krispie Treats!
Ingredient Notes
With a few simple ingredients you likely have in your pantry, you can create an easy Halloween dessert to serve your kiddos. It’s really easy to make great Halloween food.
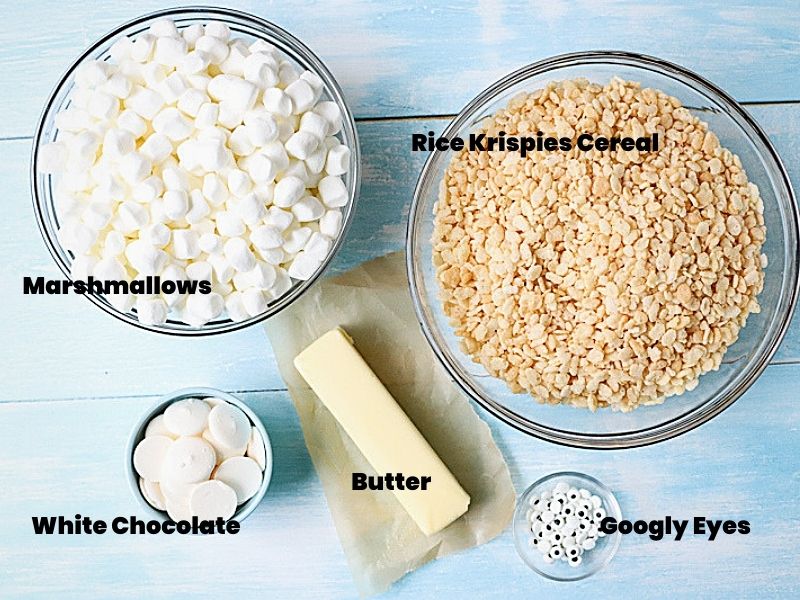
Salted Butter – an excellent balance to the sweet marshmallows.
Mini Marshmallows – you can use an equal weight of large marshmallows in the recipe, but they’ll take longer to melt.
Pure Vanilla Extract – an optional ingredient.
Rice Krispie Cereal – the main ingredient in this recipe.
White chocolate – or white candy melts.
Candy Googly Eyes – found in the baking aisle in most grocery stores.
Gluten-free version
To create gluten-free Halloween Mummy Rice Krispies treats, ensure your chocolate and candy eyes don’t contain gluten.
Also, classic Kellogg’s Rice Krispies are not gluten-free (they contain malt flavoring derived from barley). However, you can find other crispy rice cereals that are, such as Nature’s Path.
Step-By-Step Instructions
First, let’s make a pan of Rice Krispie treats.
- LINE PAN WITH PARCHMENT PAPER: Line your 9” x 9” or 9” x 13” pan with parchment paper. Leave a 1-2 inch overhang to make removing the treats easy. Alternatively, spray your pan with non-stick cooking spray. You can also measure the remaining ingredients since this recipe comes together quickly.
- MELT BUTTER and then MARSHMALLOWS: Next, melt butter in a large pot over medium-low heat. Add the marshmallows, continually stirring until they are melted. If using vanilla extract, add it now to the melted mixture and mix well.
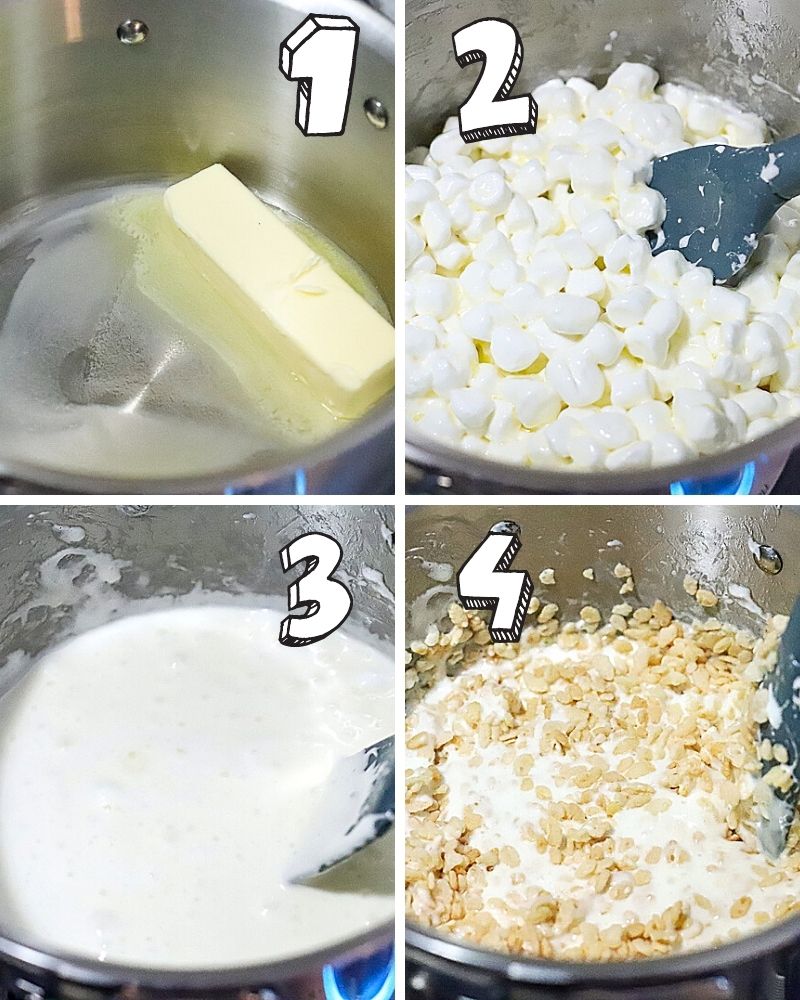
- ADD RICE KRISPIES: Remove the pan from heat and add the Rice Krispies cereal. Quickly but gently fold the mixture to coat evenly.
- PLACE IN PAN: Spread mixture into prepared baking pan. Using a spatula coated with non-stick cooking spray, gently press and spread the mixture evenly to all corners of the pan.
Pro Tip
Spray your spatula with non-stick cooking spray to help spread with Rice Krispies.
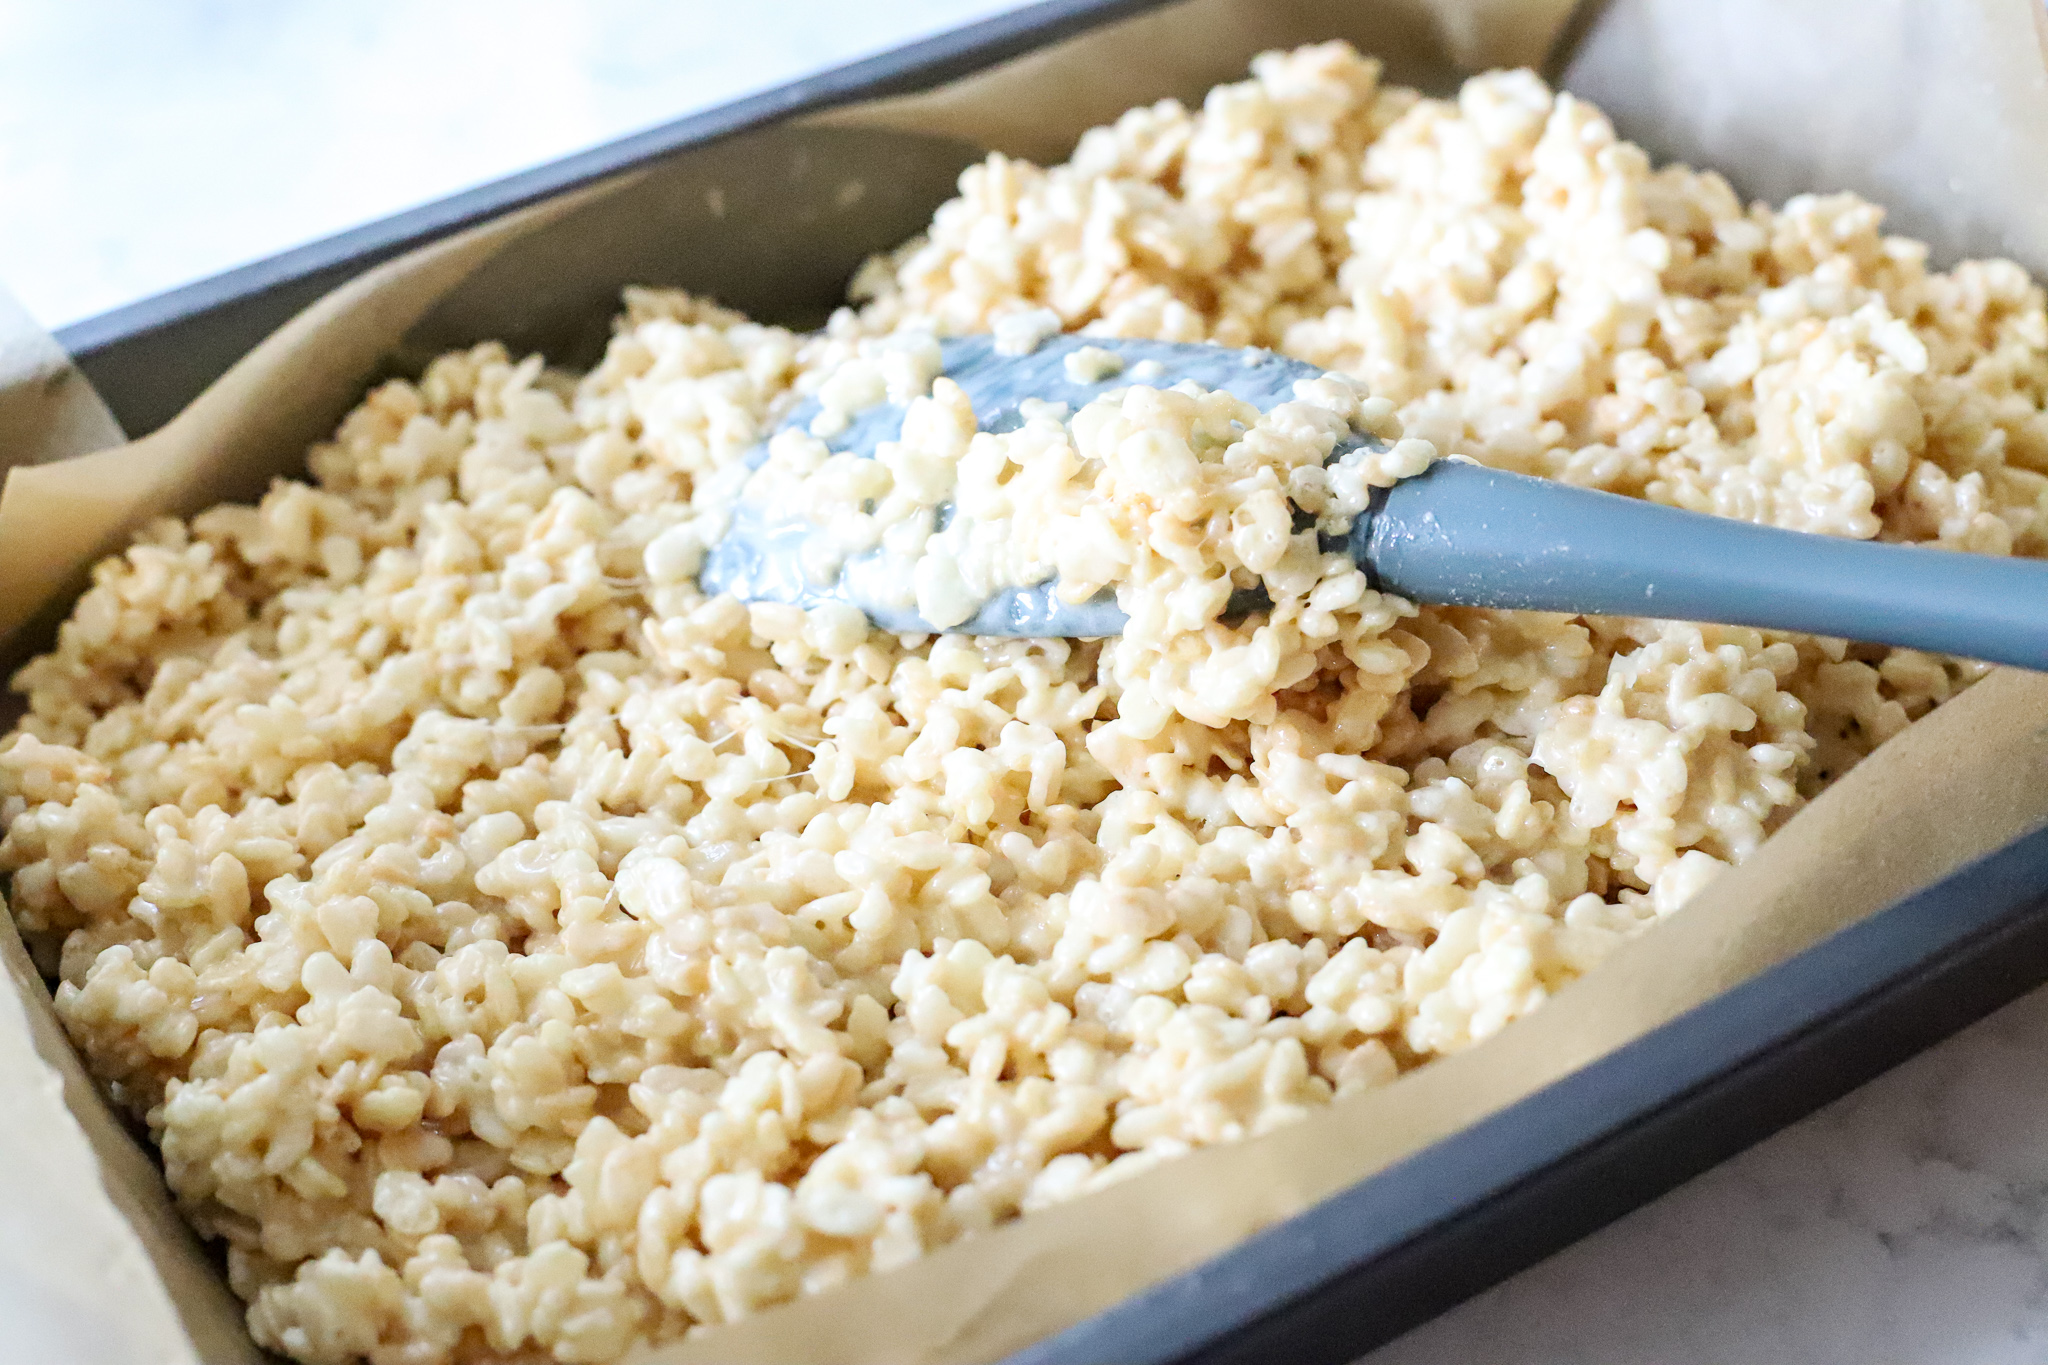
- LET SIT: Now, let the mixture sit for 30-60 minutes to harden before slicing it into rectangles.
Pro Tip
For sturdy bars that are easy to cut, wait for 2 hours.
- CUT RECTANGLE PIECES: Using the parchment paper, remove your Rice Krispie Treats from the pan and cut them into rectangular pieces. (You can cut 18 or 24 pieces, depending on how big you want your mummy treats.)
Pro Tip
I recommend using a knife that you run under hot water for a few seconds to cut the treats easily.
- MELT CHOCOLATE: Now, take your white chocolate or candy melts and place them in a microwave-safe bowl to melt them. Cook candy melts according to the package directions. If using white chocolate morsels, melt at 30-second intervals, stirring in between until the chocolate is mostly melted. Stir until all lumps dissolve.
- ADD CHOCOLATE BANDAGES: Next, place melted chocolate in a plastic zipper bag or piping bag. Snip a corner of the bag off and drizzle white chocolate back and forth over Rice Krispie Treats.
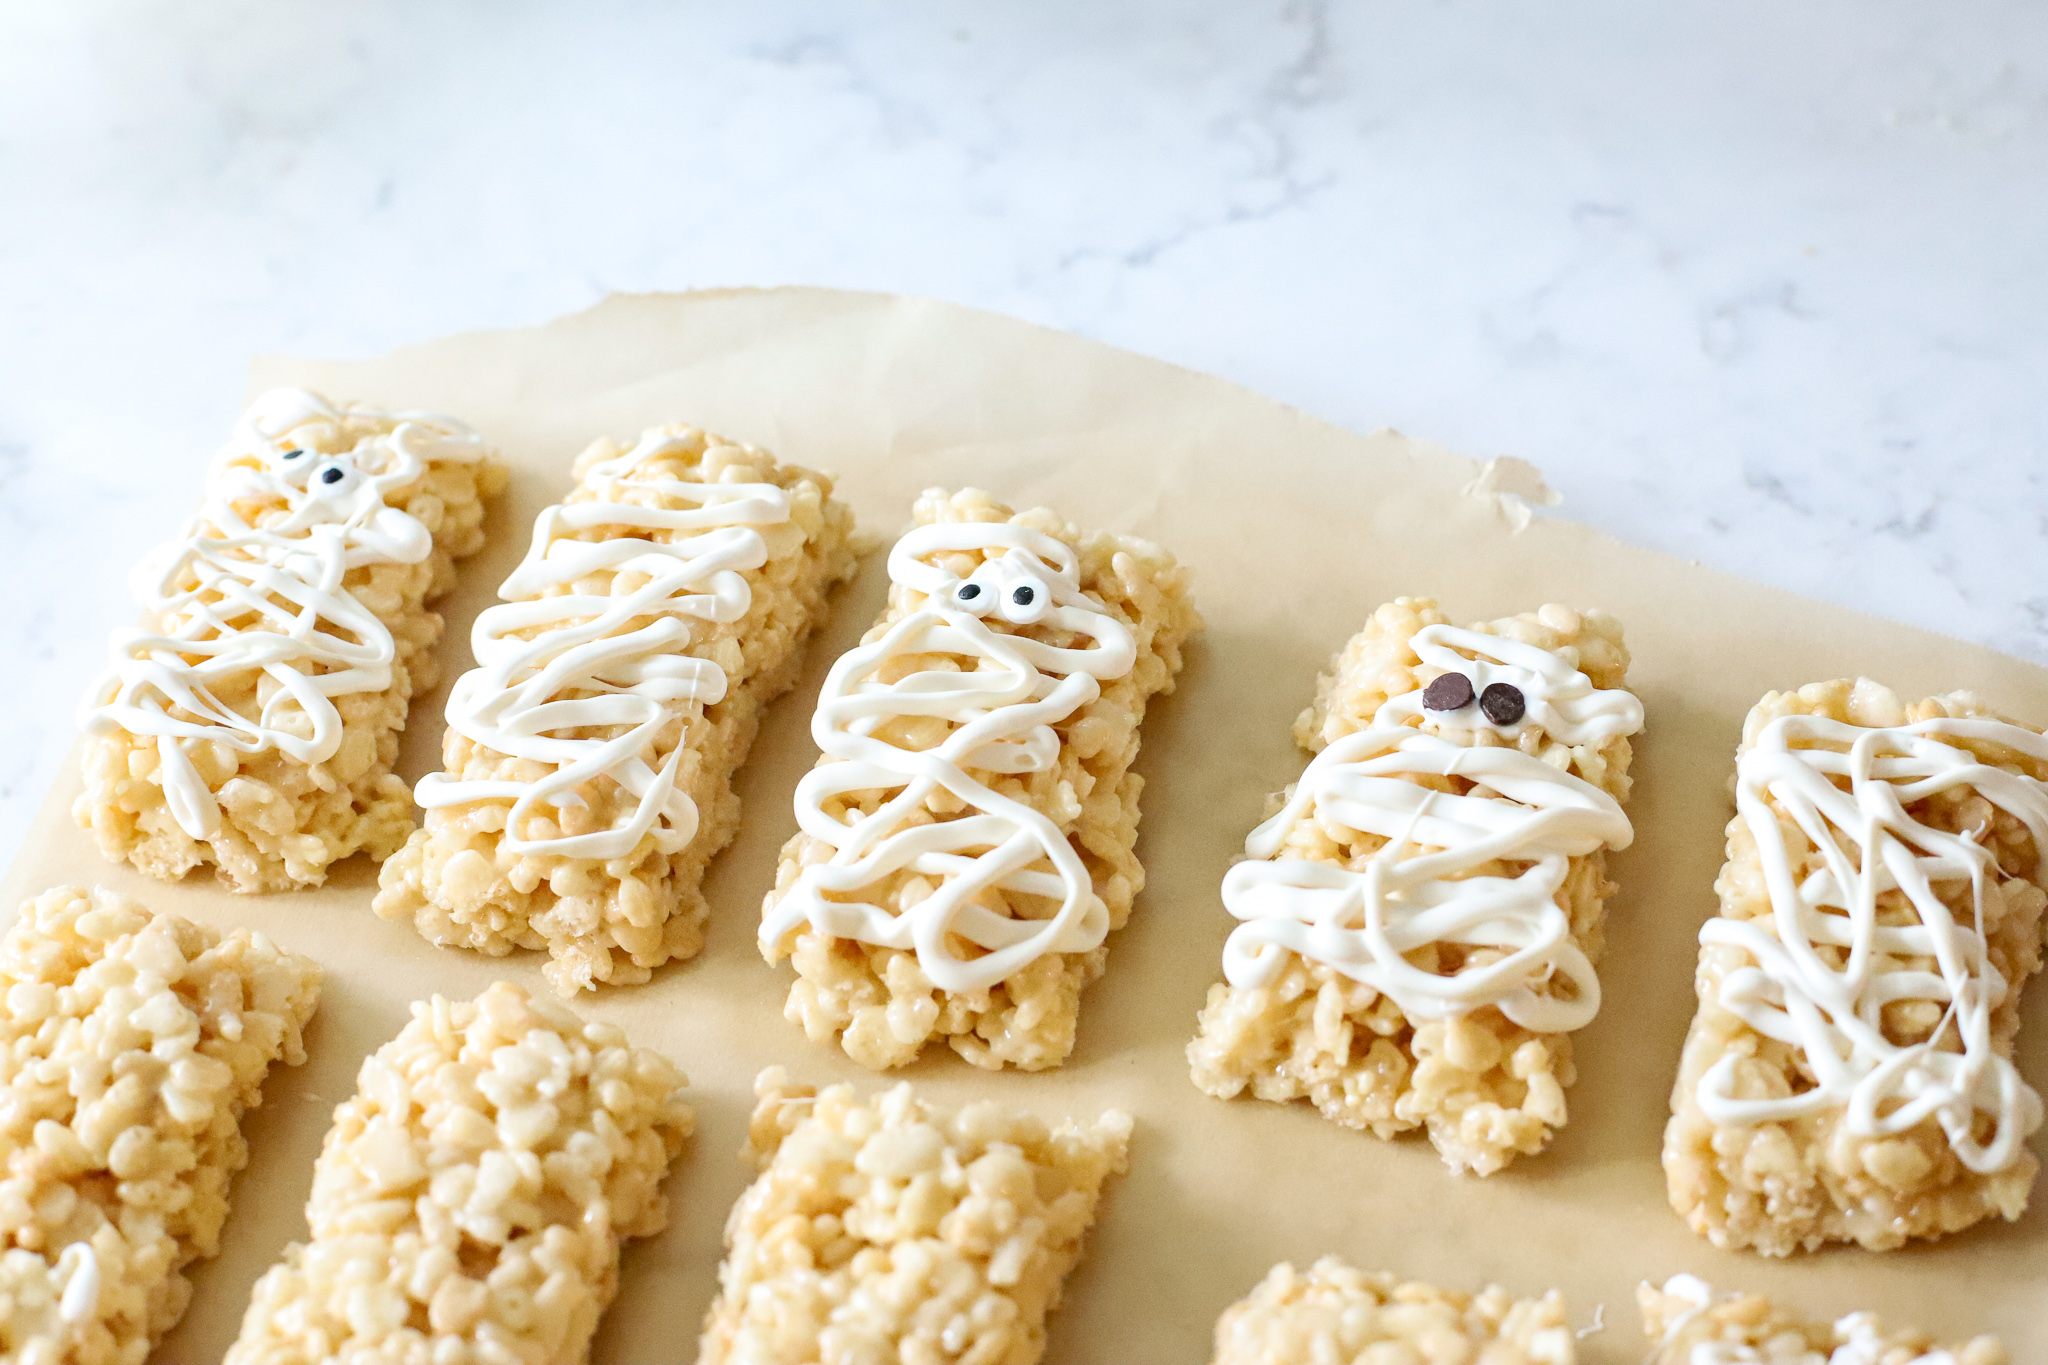
Finally, add googly eyes to each mummy treat.
Let them sit for 60 minutes to set or overnight, then eat and enjoy!
How long do Rice Krispies Treats Keep?
You can keep your Halloween Rice Krispies treats in an airtight container (or plastic bag) at room temperature for up to 7 days.
Pro Tip
I like to put a layer of parchment paper between them so they don’t stick together.
Expert Tips
- MAKE AHEAD: You can make Halloween Rice Krispies Treats a day or two in advance. Store them in an airtight container, and add the eyes just before serving to prevent them from becoming too soft.
- Use fresh, good-quality marshmallows. Old marshmallows may not melt well in this recipe.
- Cook marshmallows over medium-low heat. If you cook the recipe over high heat, there is a good chance the sugar will crystalize, turning your Halloween treats hard.
- Gently fold the Rice Krispie Cereal into marshmallows. The cereal is delicate and, if mixed harshly, gets crushed.
- Speed up the cooling process by placing the treats in the refrigerator. Putting the mummy goodies in the fridge for a few minutes will help them cool faster, so you can add their white chocolate “bandages” sooner.
- If you can’t find candy eyeballs, use mini chocolate chips.
Pro Tip
For ease and convenience, package your Mummy Treats in plastic bags for your Halloween party!
Recipe FAQs
To ensure that your Rice Krispies treats stick together well, make sure to melt the marshmallows and butter thoroughly, and evenly coat the cereal. Press the mixture firmly into the pan for a tight bond.
To make Rice Krispie Treat Mummys, white chocolate or white candy melts work well for creating the mummy wrapping effect. Melt the white chocolate and drizzle it over the Rice Krispies treats in a crisscross pattern to resemble bandages.
You can use candy eyes, mini chocolate chips, or small circular candies to create the mummy’s eyes. Place them on the treats after drizzling them with the white chocolate “bandages” while the chocolate is still soft, so they stick in place.
More Easy Halloween Treats
Pumpkin Oreo Pops
Halloween Popcorn Balls
Spider Brownies
15 Spooktacular Halloween Treats
Apple Monster Mouths
Healthy Halloween Treats
Halloween Chex Mix
Love my Halloween Mummy Rice Krispies recipe? Please leave a 5 star ⭐️⭐️⭐️⭐️⭐️ rating in the recipe card below ⬇️ and/or a review in the comment section further down.
Hungry for more? Follow Suburban Simplicity on Facebook, Instagram, YouTube, and Pinterest to see more DIYs, recipes, and home tips!
Also, don’t forget to sign up for email!
I only send one email a week, and it’ll include my latest recipes, DIYs, and tips, information about exclusive “email only” giveaways, and more! See form below!
Want to subscribe to the Suburban Simplicity Recipe Club? It’s only $5 per month, and you’ll get ad-free PDFs of any new recipes that I post while supporting me at the same time! Join the club, here.

Mummy Rice Krispies Treats Recipe
Ingredients
- ½ cup salted butter
- 1 16 ounce bag mini marshmallows, 10 cups
- 7 cups Rice Krispies Cereal
- 1 teaspoon pure vanilla extract, optional
- 6-8 ounces white chocolate morsels, or candy melts
- 48 Candy Googly Eyes
Equipment
- 9 "x 9" or 13"x9" baking pan
- plastic baggie
Instructions
- Line 9” x 9” or 9” x 13” pan with parchment paper. Make sure you leave a 1-2 inch overhang to make removing the treats easy. Alternatively, you can spray your pan with non-stick cooking spray.
- Measure out ingredients.
- In a large pot, melt butter over medium-low heat. Add all the marshmallows, continually stirring, just until marshmallows are melted. If using vanilla extract, add it to the mixture after marshmallows are melted.
- Remove from heat and add in the Rice Krispies cereal. Quickly but gently fold the mixture to coat evenly.
- Spread mixture into prepared baking pan. Using a spatula coated with non-stick cooking spray, gently press and spread the mixture evenly to all corners of the pan. Let the mixture sit for 30-60 minutes to harden before slicing.
- Remove your Rice Krispie Treats from the pan using parchment paper. Cut into rectangular pieces. (18 or 24 pieces depending on how big you want your mummy treats.)
- Now, take your white chocolate or candy melts and place them in a microwave-safe bowl to melt them. Cook candy melts according to the package directions. If using white chocolate morsels, melt at 30-second intervals, stirring in-between until chocolate is mostly melted. Stir until all lumps dissolve.
- Place melted chocolate in a plastic zipper bag or piping bag. Snip a corner of the bag off and drizzle white chocolate back and forth over Rice Krispie Treats. Add googly eyes to each treat. Let sit for 60 minutes or overnight and enjoy it!
Notes
- Use fresh, good-quality marshmallows. If your marshmallows are old, they may not melt well in this recipe.
- Cook marshmallows over medium-low heat. If you cook the recipe over high heat, there is a good chance the sugar will crystalize, turning your Halloween treats hard.
- Gently fold the Rice Krispie Cereal into marshmallows. The cereal is delicate and, if mixed harshly, gets crushed.
- Speed up the cooling process by placing the treats in the refrigerator. Putting the mummy goodies in the fridge for a few minutes will help them cool faster, so you can add their white chocolate “bandages” sooner.
- Store treats in an airtight container at room temperature for 3 days.


Yum – We have a treat table at our Halloween party, I made these and they were a hit!
Such a fun halloween recipe & so yummy! ( I’m a sucker for rice krispie treats )
We make these every year now….such a cute and tasty treat!
We make them every year too! Such a fun little Halloween treat.
We had so much fun making these! Such a great Halloween recipe!
So happy to hear it! This is a great family activity to do around Halloween!
What a fun and tasty treat for Halloween! My kids will love making these this season!
A classic treat with a spooky good update! Thanks for giving them a try, Sara!
My kids are going to LOVE these! They are SO adorable!
These really are the perfect Halloween treat! Easy to make and you have a whole pan to serve!