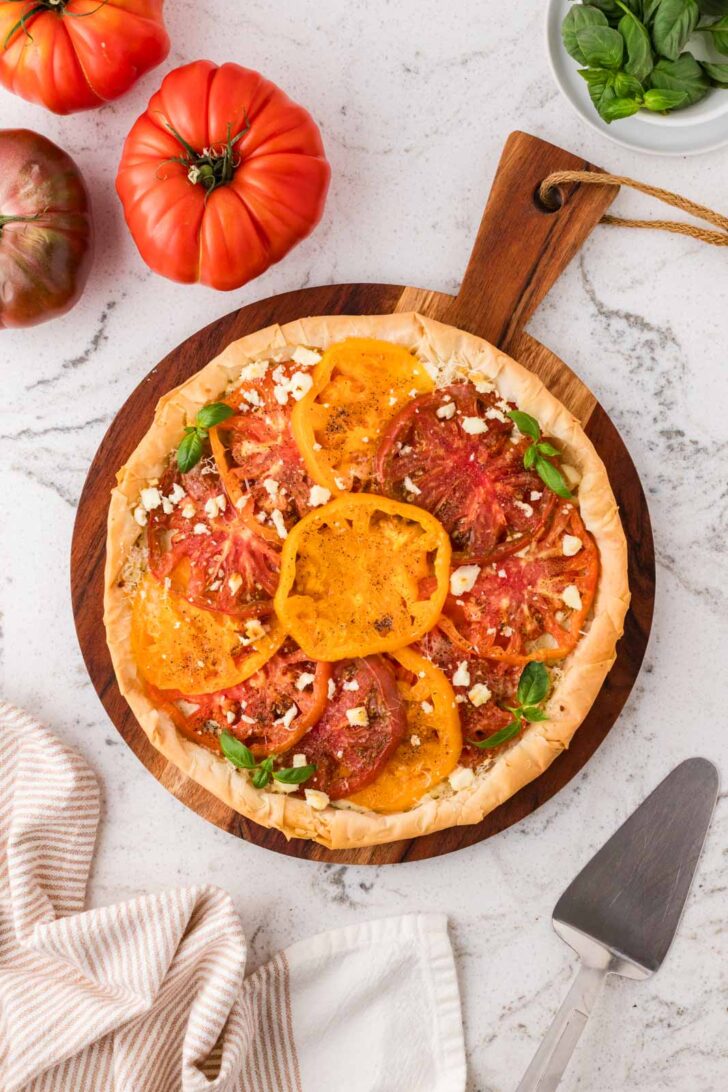
Summer Heirloom Tomato Pie
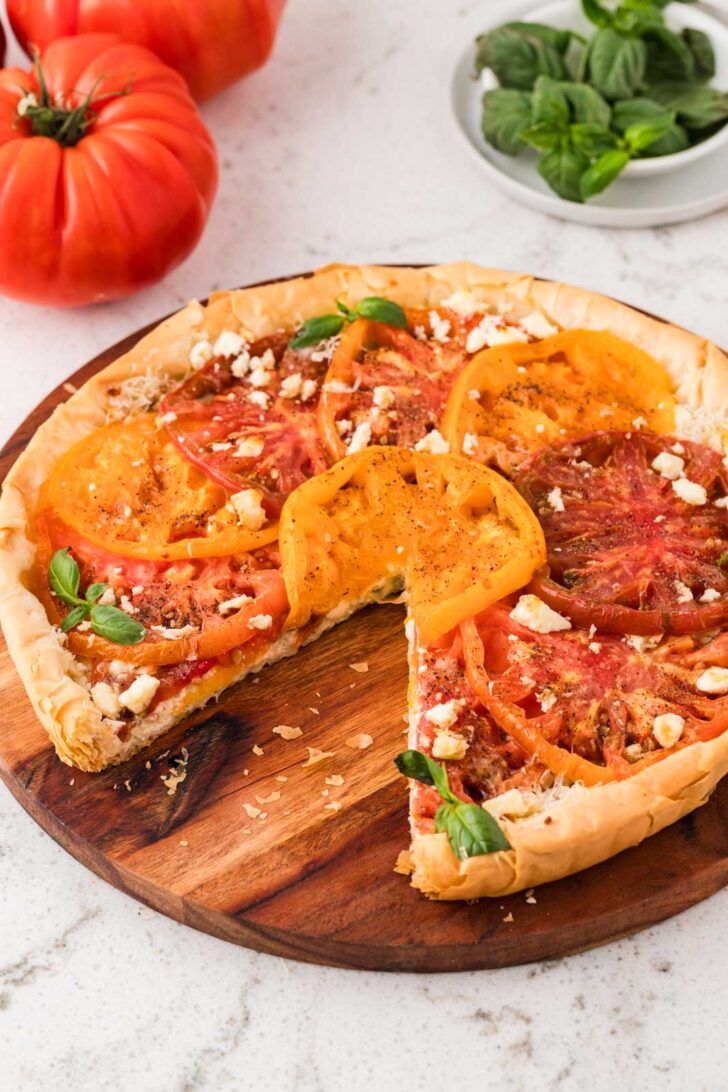
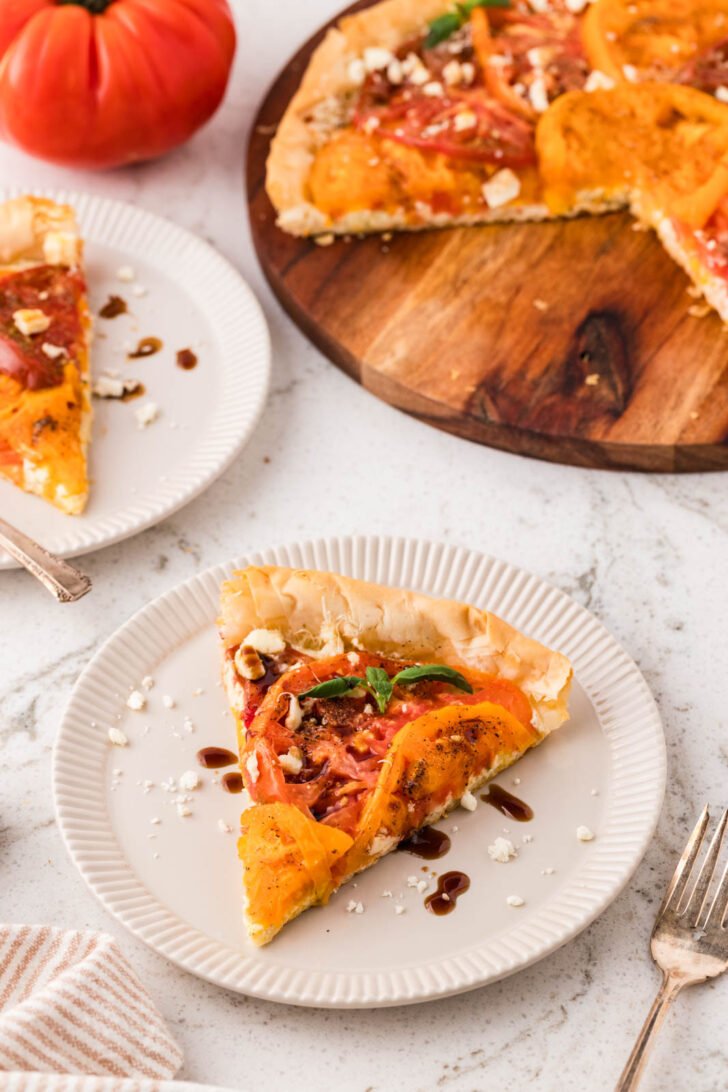
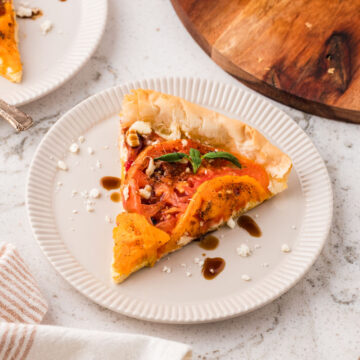
Nothing says summer like fresh tomatoes. This heirloom tomato pie boasts a crispy, golden phyllo crust, a creamy layer of garlic and herb cheese, and two kinds of salty, melty cheese tucked between layers of juicy summer tomatoes. Topped with a drizzle of balsamic glaze and a few basil leaves, and this pie looks like something you could order at a little farm to table restaurant.
Heirloom tomatoes have so much flavor on their own, and this pie really lets them shine instead of burying them under a heavy crust or a ton of mayonnaise like a lot of tomato pie recipes do. The phyllo here is the real trick. It bakes up shatteringly crisp, and it’s a lot less fussy than rolling out a pie crust from scratch. If you’ve never worked with phyllo before, don’t worry. I walk you through it step by step below.
Scroll down for the full printable recipe, or keep reading for ingredient notes, tips, and answers to the questions I get asked most about recipes like this one!

Why You’ll Love This Tomato Pie
- It’s a genuinely beautiful way to use up a big haul of summer tomatoes, especially the ones that are almost too pretty to chop up.
- The phyllo crust is light and crisp, not heavy or doughy, so the tomatoes shine through.
- It works as a main dish for a light summer dinner, or you can slice it into smaller pieces and serve it as an appetizer.
- It’s easier to pull off than it looks. There’s no pie dough to make from scratch and no fussy lattice work, just layering.
Describing The Taste of This Tomato Pie
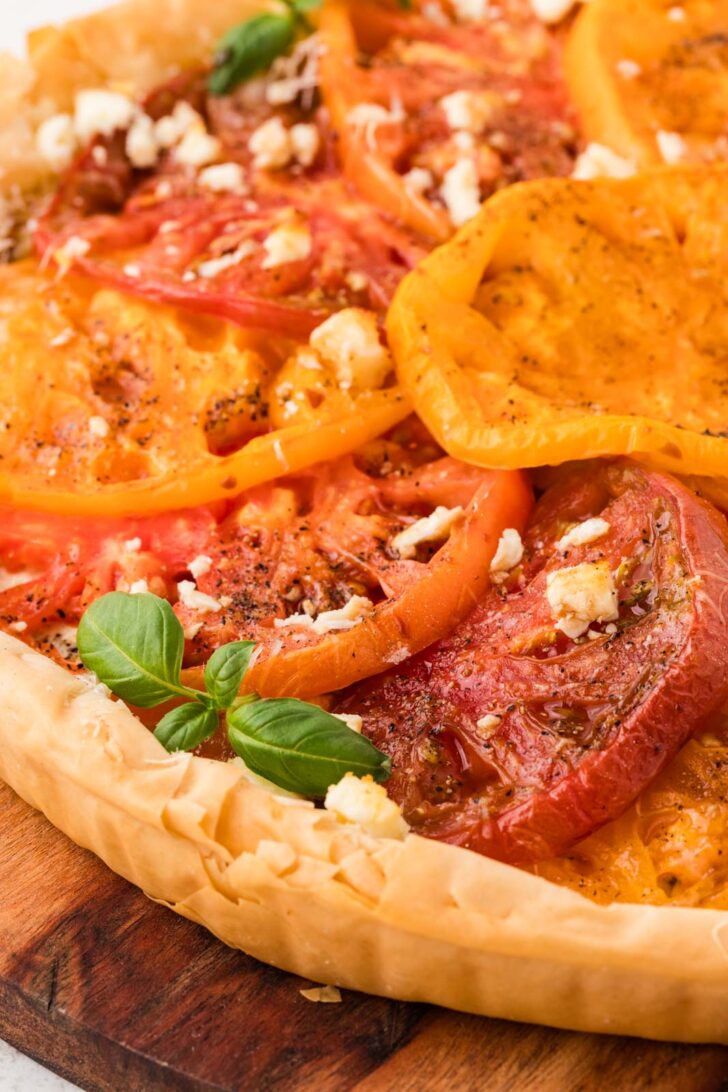
This one is bright, savory, and a little tangy, with a good balance of rich and fresh. The garlic and herb cheese melts into something almost like a savory custard underneath the tomatoes, the feta adds salty little pops throughout, and the Parmesan gives the top a nutty, golden crust. The tomatoes themselves turn soft and a little jammy as they bake, but they still taste fresh and vibrant. The balsamic glaze on top ties it all together with just enough sweetness. If you’ve ever had a really good tomato galette or a Mediterranean style savory tart, this is in that same family, just a little more rustic.
Equipment You’ll Need
- Cutting board and chef’s knife
- Rimmed baking sheet and a large tray
- Paper towels
- 10-inch tart pan with a removable bottom
- Microwave-safe bowl
- Pastry brush
- Fork
- Parchment paper
- Pie weights (or one of the swaps below)
- Offset spatula
- Serrated knife
How to Make Heirloom Tomato Pie
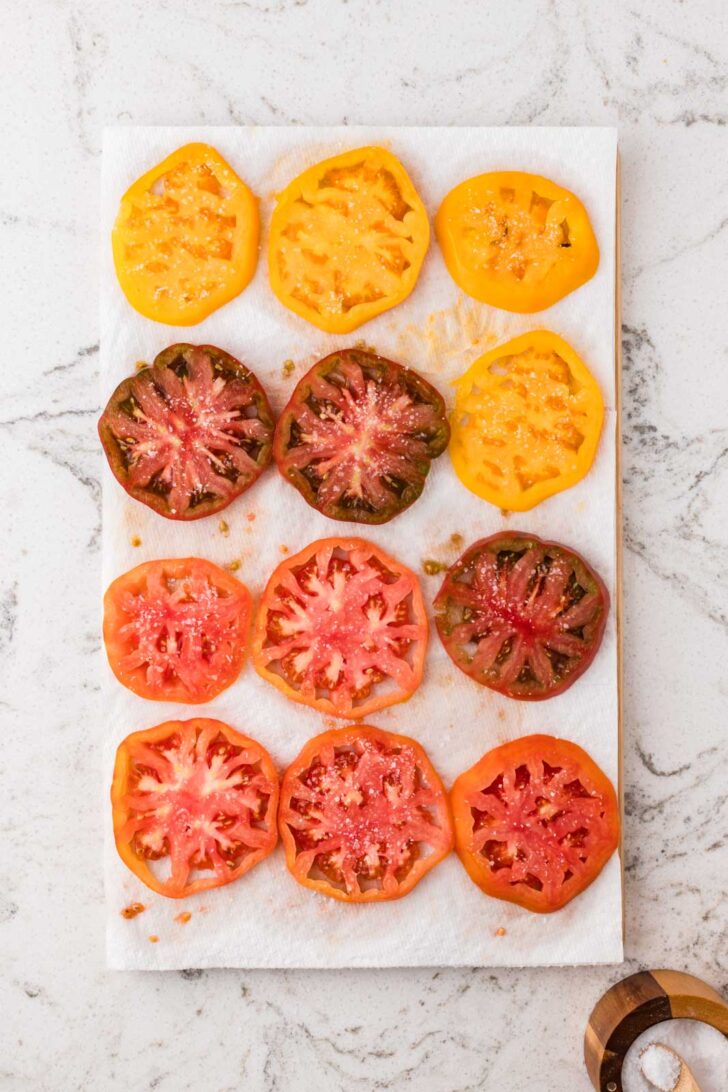
Step 1: Salt and Drain the Tomatoes
Slice the tomatoes about ¼ inch thick and lay them out in a single layer on paper towel lined trays or baking sheets. Sprinkle them with kosher salt and let them sit for 30 minutes. This pulls out a surprising amount of liquid. Once the time is up, gently blot both sides of every slice with more paper towels. Don’t skip this part. It’s the difference between a crisp crust and a soggy one.

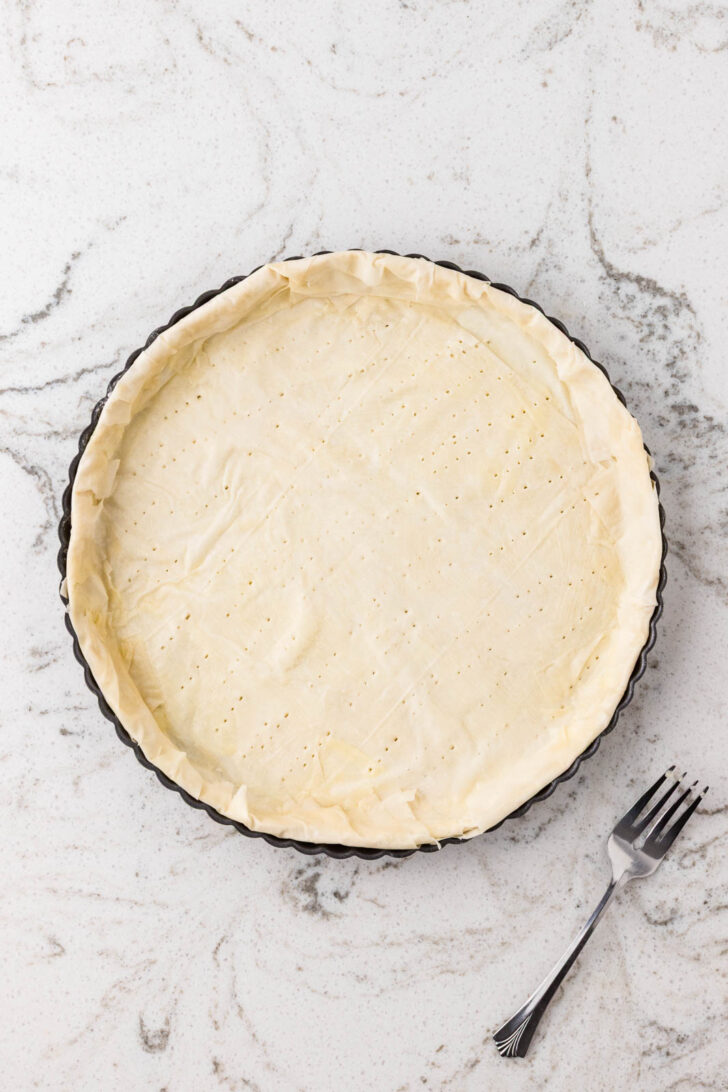
Step 2: Layer the Phyllo
While the tomatoes rest, preheat your oven to 375°F and set a 10-inch tart pan on a rimmed baking sheet (this catches any butter that drips during baking). Lay one sheet of phyllo in the pan, letting the edges hang over the sides, and brush it lightly with melted butter. Repeat with the rest of the sheets, rotating each one slightly so the overhang ends up staggered all the way around. Press the layered phyllo gently into the bottom and up the sides of the pan, then fold or crinkle the overhanging edges over to make a loose, rustic looking border. Brush the edges with whatever butter you have left.
A quick tip here: keep the phyllo sheets you aren’t using covered with a barely damp towel the whole time. Phyllo dries out fast, and once it starts cracking, it’s hard to work with.

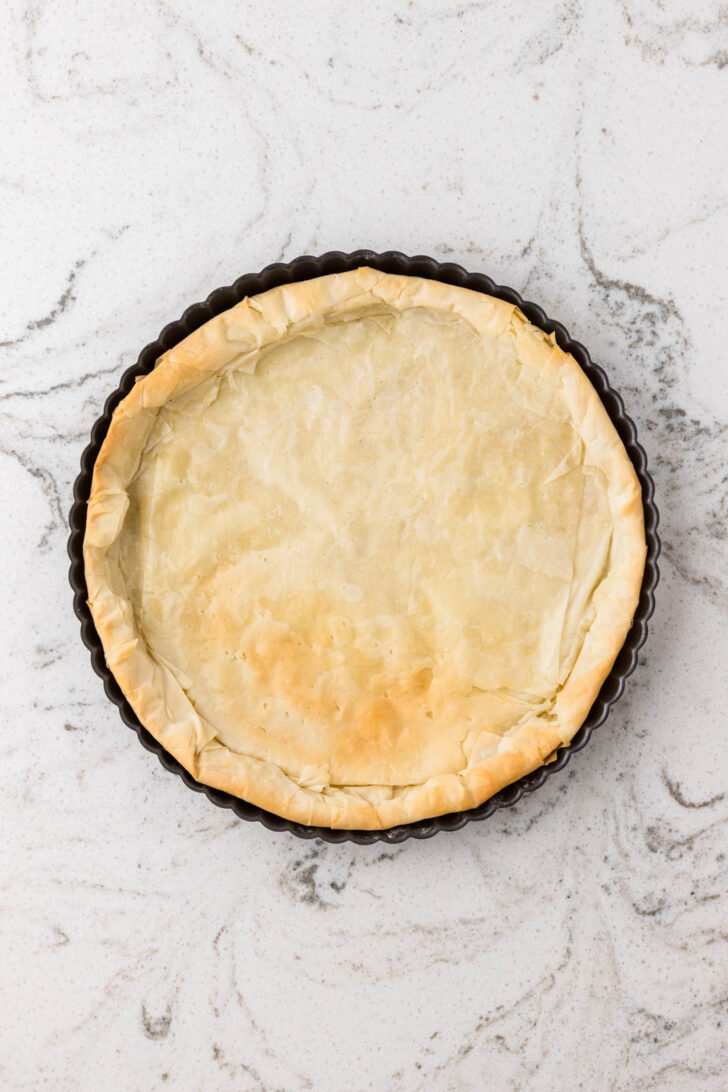
Step 3: Blind Bake the Crust
Prick the bottom of the crust a few times with a fork, line it with parchment paper, and fill it with pie weights. Bake at 375°F for 8 to 10 minutes, then carefully lift out the parchment and weights. If the bottom still looks a little wet, pop it back in uncovered for another 2 to 3 minutes until it’s dry and lightly golden at the edges.
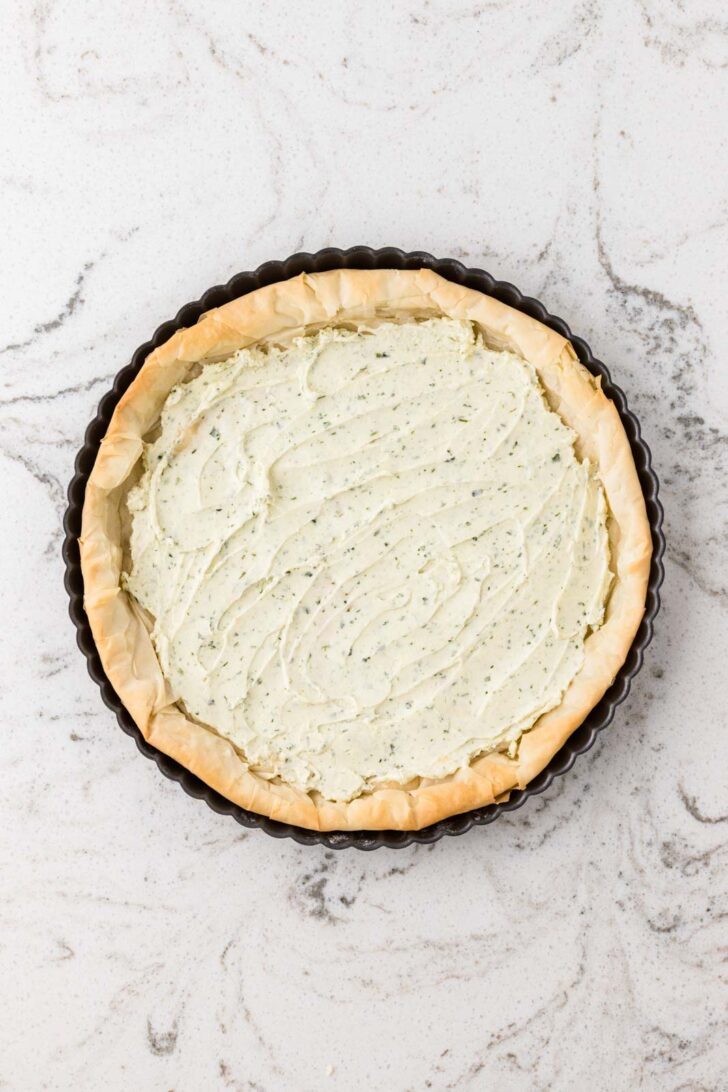
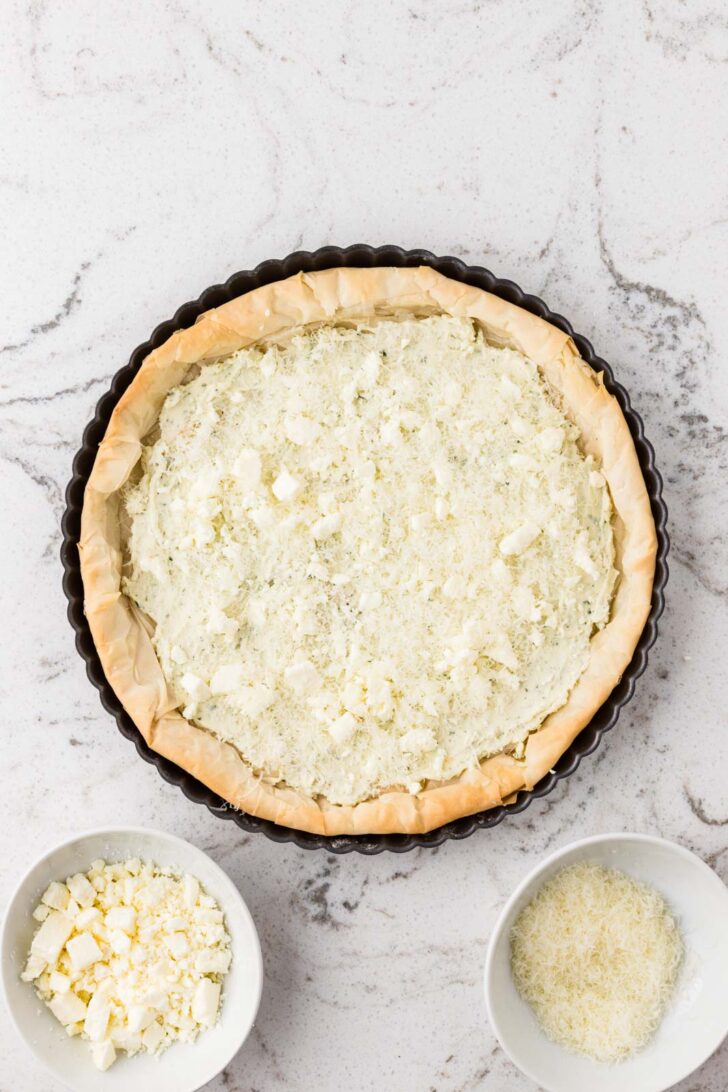
Step 4: Add the Cheese Layers
As soon as the crust comes out of the oven, drop the softened garlic and herb cheese in small dollops over the warm bottom. Spread it gently into a thin, even layer, leaving about a half inch border around the edge so it doesn’t escape over the side. Sprinkle on half of the feta and half of the Parmesan.
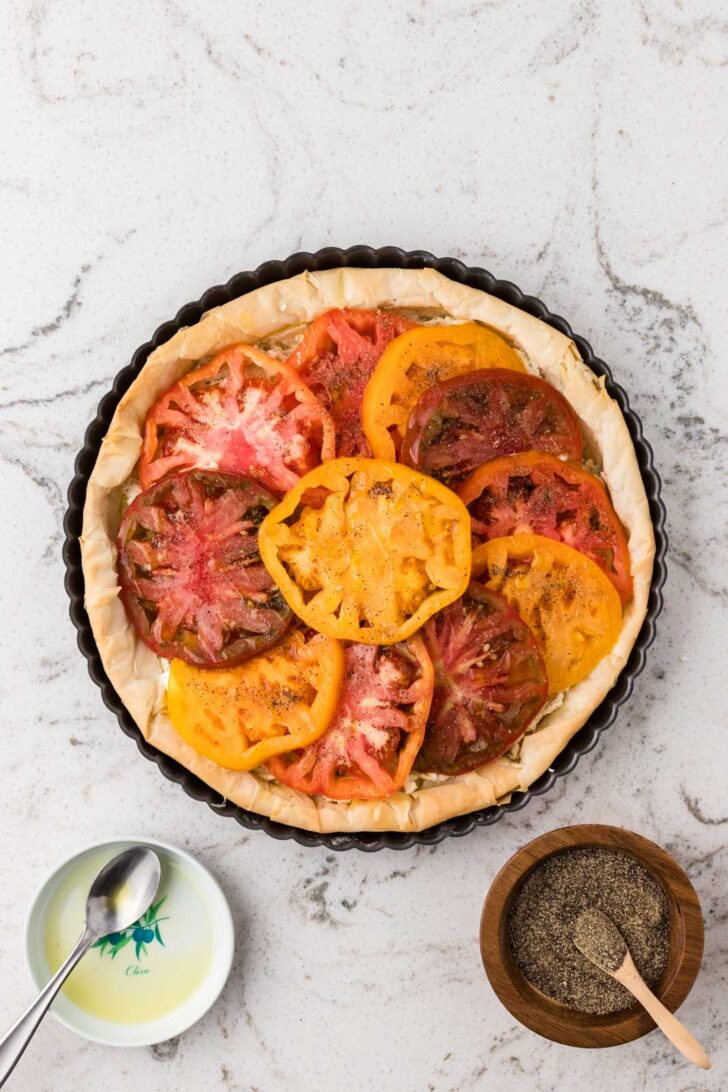
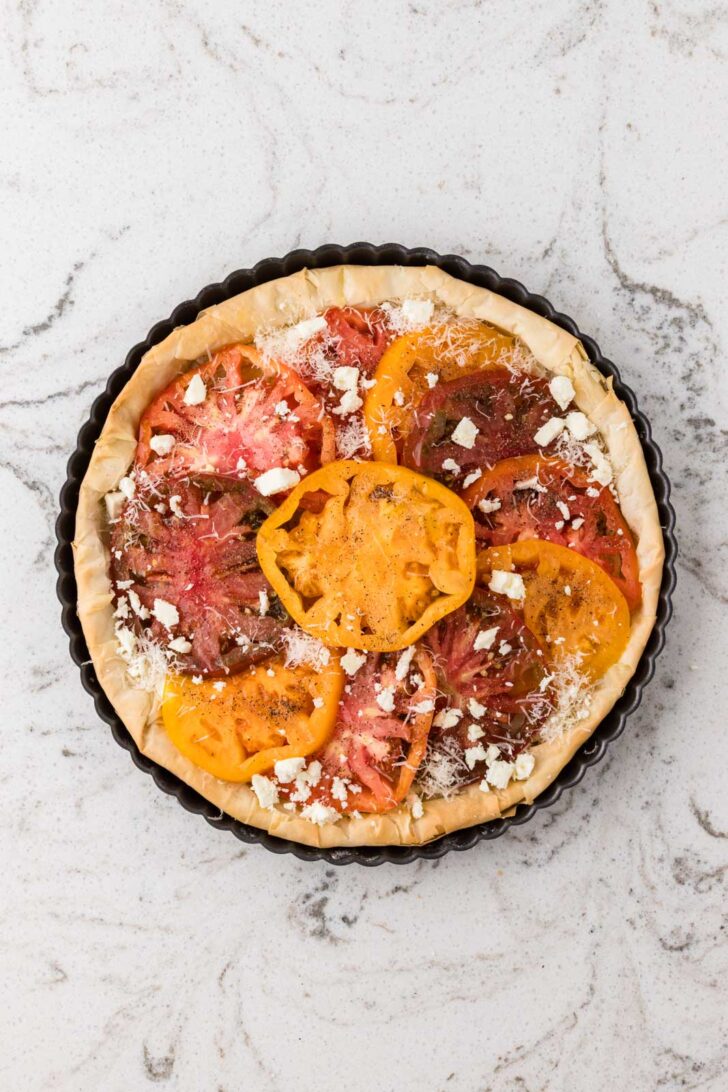
Step 5: Add the Tomatoes and Bake
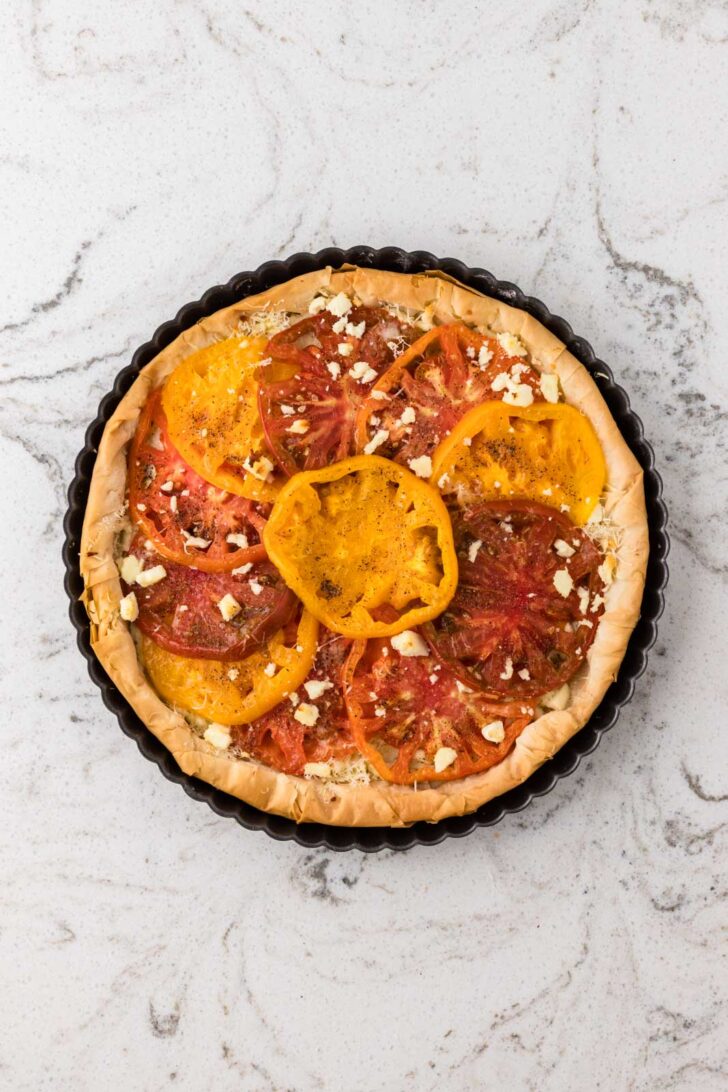
Arrange your blotted tomato slices over the cheese, overlapping them slightly as you go so the whole top is covered. Drizzle with olive oil, season with black pepper, then top with the rest of the feta and Parmesan. Bake at 375°F for 20 to 25 minutes, until the phyllo is deeply golden, the cheese is lightly browned, and the tomatoes look tender without a pool of liquid sitting on top.
Step 6: Cool and Garnish
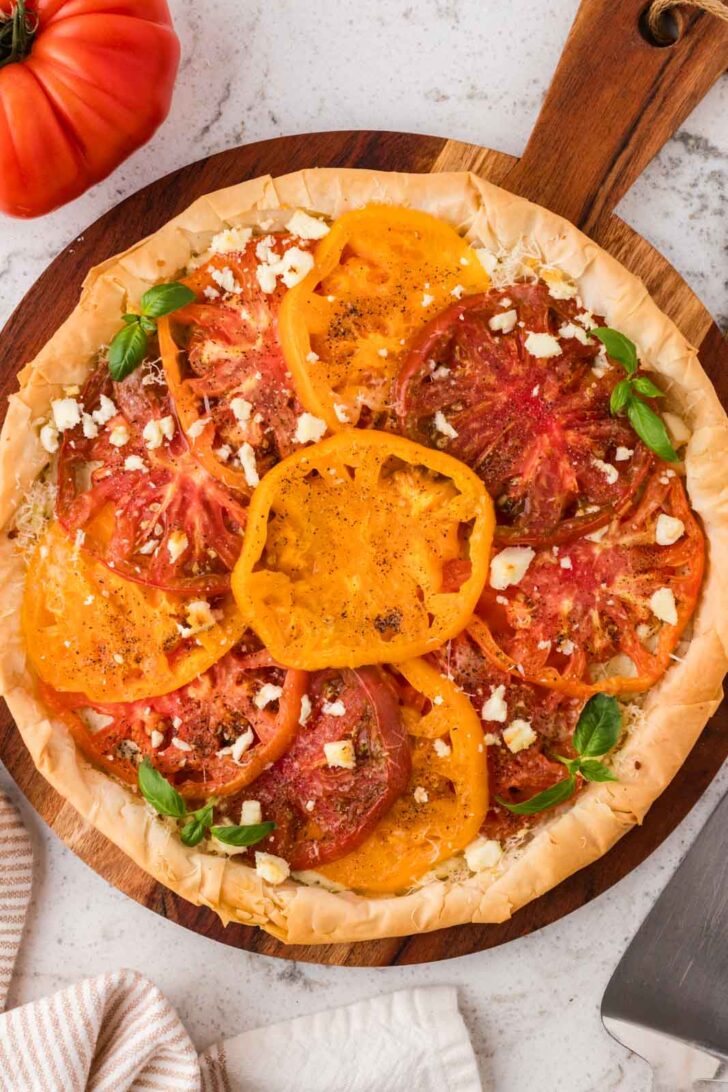
Let the pie cool in the pan for 10 minutes before carefully removing the outer ring of the tart pan. Finish with fresh basil leaves and a drizzle of balsamic glaze, then slice with a sharp serrated knife. It’s just as good warm as it is at room temperature.
No Pie Weights? Here’s What to Use Instead
You don’t need a bag of ceramic pie weights sitting in your pantry to blind bake this crust. A few easy substitutes work just as well.
- Dried beans or rice. The most common pantry swap, and a reliable one. Keep this batch set aside just for blind baking from now on, since they aren’t great to eat after going through the oven, but they’ll work as weights again and again.
- Granulated sugar. Pour it evenly over the parchment, right up to the edges, and it’ll weigh the dough down just like store bought weights. Once it cools, you can pour it right back into your sugar jar and bake with it like normal.
- A second tart or cake pan, set right on top. If you have one that fits inside the crust, set it directly on the dough (no parchment needed in this case) to weigh it down evenly.
- Oven safe ramekins or mugs. Arrange a few across the bottom of the crust to add weight, especially where the bottom meets the sides.
- Heavy duty foil, pressed in firmly. Skip the parchment and weights combo and press a double layer of foil tightly into the crust instead, making sure it’s snug in every corner. It won’t weigh things down quite the same way, but it does a good job keeping the phyllo from puffing up. You might need an extra minute or two of bake time.
The goal with any of these is the same: keep the phyllo pressed flat against the pan so it bakes evenly instead of puffing up in random spots.
Tips for the Best Tomato Pie
- Don’t rush the salting step. Even if your tomatoes don’t look watery, they’re holding onto a lot of moisture you can’t see. Give them the full 30 minutes and blot well.
- Brush the phyllo lightly, not heavily. A thick coating of butter will make the bottom heavy and greasy instead of light and crisp. A light brushing is all you need.
- Spread the herb cheese gently. The baked phyllo is delicate and can tear if you press too hard. Small dollops spread out with a light hand work better than trying to spread one big scoop.
- Slice your tomatoes evenly. Aim for about ¼ inch thick. Thinner slices can fall apart, and thicker ones won’t cook through as nicely.
- Let it rest those 10 minutes before slicing. It helps everything set up just enough to cut cleanly instead of sliding apart.

More Recipes to Try
If you’re in the mood for more phyllo, tomatoes, or feta, here are a few more from the blog worth checking out:
- Easy Cranberry Brie Bites (Phyllo Cups) for another easy way to work with phyllo
- Heavenly Blueberry Tart with Puff Pastry if you want to build out your tart-making skills
- Easy One-Pot Mediterranean Quinoa, which pairs really nicely alongside a slice of this pie
- Browse more Easy Summer Appetizers for your next backyard gathering
Check out the full Recipe Index for everything else on the blog

Troubleshooting and FAQs
Why is the bottom of my tomato pie soggy? This almost always comes back to moisture from the tomatoes. Make sure you salt them and let them rest the full 30 minutes, then blot them thoroughly on both sides before they go anywhere near the crust. If your tomatoes were especially juicy, you can blot a second time for good measure.
My phyllo kept cracking while I worked with it. What went wrong? Phyllo dries out fast once it’s exposed to air, and dry phyllo cracks easily. Keep the sheets you aren’t currently using covered with a barely damp kitchen towel, and try to work fairly quickly once you start layering.
Can I use a different kind of crust, like puff pastry or a regular pie crust? You can, but it changes the pie quite a bit. Puff pastry bakes up thicker and rises in a way phyllo doesn’t, so you’ll lose that light, crackly texture that makes this version special. A regular pie crust would also work, but it will bake and taste more like a traditional savory pie than this lighter, more rustic version.
Why does my pie look watery after baking? This usually means the tomatoes weren’t blotted well enough before baking, or they were sliced a bit too thick to release moisture properly while cooking. If you notice some liquid pooling, you can blot the top gently with a paper towel right after it comes out of the oven.
Can I use regular tomatoes instead of heirloom? Yes, firm garden tomatoes or ripe slicing tomatoes both work well. Just avoid anything that feels overly soft or watery, since that extra moisture will work against the crisp crust.
What can I use instead of garlic and herb cheese? Plain cream cheese mixed with a little Italian seasoning, garlic powder, and some chopped fresh herbs makes a good homemade substitute if you can’t find a tub of the pre-made kind.
Can I make this ahead of time? The tomatoes can be sliced, salted, and blotted a few hours ahead and kept covered in the fridge until you’re ready to assemble. The fully baked pie is best served the same day it’s made, since the phyllo is at its crispiest right after baking, but leftovers still taste great the next day.
How do I store and reheat leftovers? Refrigerate leftover pie in an airtight container, or wrap individual slices loosely in foil, for up to 3 days. Reheat slices in a 350°F oven for 8 to 12 minutes, until the crust crisps back up and the center is warmed through. Don’t use the microwave for this one. It’ll make the phyllo soft and chewy instead of crisp.
Can I freeze tomato pie? I don’t recommend it. Tomatoes release even more liquid once they’ve been frozen and thawed, which will make that delicate phyllo crust go soggy fast.
Is this served hot or cold? Either one works. It’s lovely warm right out of the oven, but it holds up just as well at room temperature, which makes it a great make-ahead option for parties or potlucks.
What goes well with this for dinner? Since it’s on the lighter side, I love serving it alongside a simple green salad or something with a Mediterranean flavor profile, like a quinoa or orzo salad with feta and olives.

Storage: The pie can sit at room temperature for up to 2 hours while serving. Refrigerate leftovers in an airtight container, or wrapped individually in foil, for up to 3 days. Reheat in a 350°F oven for 8 to 12 minutes. Freezing is not recommended.
Love this recipe? Please leave a 5-star ⭐️⭐️⭐️⭐️⭐️ rating in the recipe card below ⬇️ and/or a review in the comment section further down.
Hungry for more? Follow Suburban Simplicity on Facebook, Instagram, YouTube, and Pinterest to see more DIYs, recipes, and home tips!
Also, don’t forget to sign up for email!
I only send one email a week, and it’ll include my latest recipes, DIYs, and tips, information about exclusive “email only” giveaways, and more! See form below!
Want to subscribe to the Suburban Simplicity Recipe Club? It’s only $5 per month, and you’ll get ad-free PDFs of any new recipes that I post while supporting me at the same time! Join the club, here.
Summer Heirloom Tomato Pie
Ingredients
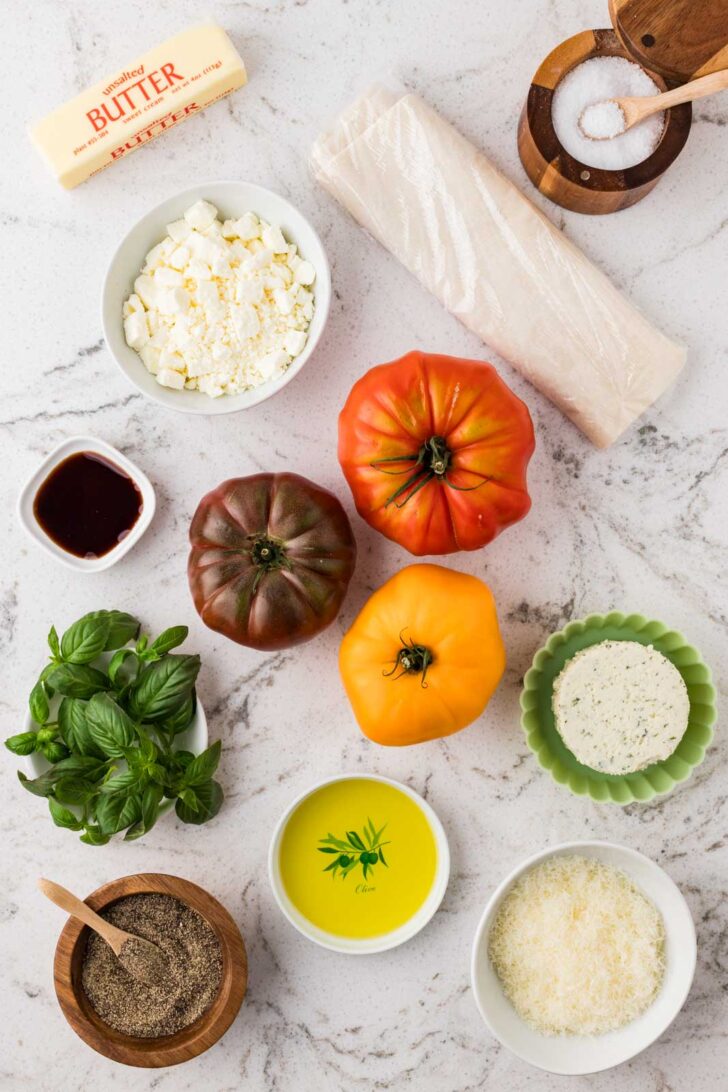
- 2 pounds heirloom tomatoes
- 1 teaspoon kosher salt
- ½ cup unsalted butter, melted and slightly cooled
- 10 sheets frozen phyllo dough, thawed
- 1 5.3-ounce package garlic and fine herbs cheese, softened
- Olive oil, for drizzling
- ½ teaspoon ground black pepper
- ½ cup crumbled feta cheese, divided
- ½ cup grated Parmesan cheese, divided
- Fresh basil leaves, for garnish
- Balsamic glaze, for drizzling
Equipment
- offset spatula
- cutting board
- Pastry Brush
- forks
- 9×13 Rimmed Baking Sheet
- microwave safe bowl
- sharp knife
Instructions
- Slice 2 pounds of heirloom tomatoes into ¼-inch-thick slices. Arrange the tomato slices in a single layer on paper towel-lined baking sheets or large trays, then sprinkle them evenly with 1 teaspoon kosher salt. Let the tomatoes rest for 30 minutes, then gently blot both sides with additional paper towels to remove as much moisture as possible.
- Preheat the oven to 375°F. Place a 10-inch tart pan with a removable bottom on a rimmed baking sheet to catch any butter that may drip during baking.
- Place 1 sheet of thawed phyllo dough in the tart pan, allowing the edges to overhang. Lightly brush with some of the ½ cup melted butter, then repeat with the remaining 9 sheets, rotating each one slightly as you layer.
- Gently press the phyllo into the bottom and up the flared sides of the pan. Loosely fold or crinkle the overhanging phyllo around the top edge to create a rustic crust, then brush the edges with any remaining melted butter.
- Prick the bottom of the phyllo crust several times with a fork. Line the crust with parchment paper, fill it with pie weights, and bake at 375°F for 8-10 minutes. Carefully remove the parchment and pie weights. If the bottom still looks wet, return the uncovered crust to the oven for 2-3 minutes, or until it looks dry and the edges are lightly golden.
- Remove the crust from the oven and immediately place evenly spaced dollops of (1) softened 5.3-ounce package of garlic and fine herbs cheese over the warm bottom. Gently spread the cheese into a thin, even layer, leaving about a ½-inch border around the edge. Sprinkle ¼ cup crumbled feta cheese and ¼ cup grated Parmesan cheese over the herb cheese, reserving the remaining feta and Parmesan for the top.
- Arrange the blotted heirloom tomato slices over the cheese layer, slightly overlapping them as needed. Lightly drizzle the tomatoes with olive oil, then sprinkle them evenly with ½ teaspoon ground black pepper. Finish with the remaining ¼ cup crumbled feta cheese and ¼ cup grated Parmesan cheese.
- Return the pie to the oven and bake it at 375°F for 20-25 minutes, or until the phyllo is deeply golden and crisp, the cheeses are lightly browned, and the tomatoes are tender without being surrounded by excess liquid.
- Let the pie cool in the pan for 10 minutes. Carefully remove the outer ring of the tart pan, then garnish the pie with fresh basil leaves and a drizzle of balsamic glaze.
- Slice the heirloom tomato pie with a sharp serrated knife and serve it warm or at room temperature. ENJOY!
Notes
- Salting and thoroughly blotting the tomatoes is one of the most important steps because heirloom tomatoes contain a lot of moisture that could make the phyllo crust soggy.
- The tomatoes should be sliced about ¼ inch thick so they soften during baking without completely breaking down or releasing too much liquid.
- Keep the unused phyllo sheets covered with a barely damp kitchen towel while assembling the crust because exposed phyllo can dry out and crack very quickly.
- Brush the phyllo with a light coating of butter rather than saturating each sheet, since too much butter can make the bottom heavy instead of delicate and crisp.
- Spread the softened herb cheese very gently over the phyllo crust because the thin, crisp layers can tear easily. Adding the cheese in small, evenly spaced dollops as soon as the crust comes out of the oven makes it easier to spread without pressing too firmly.