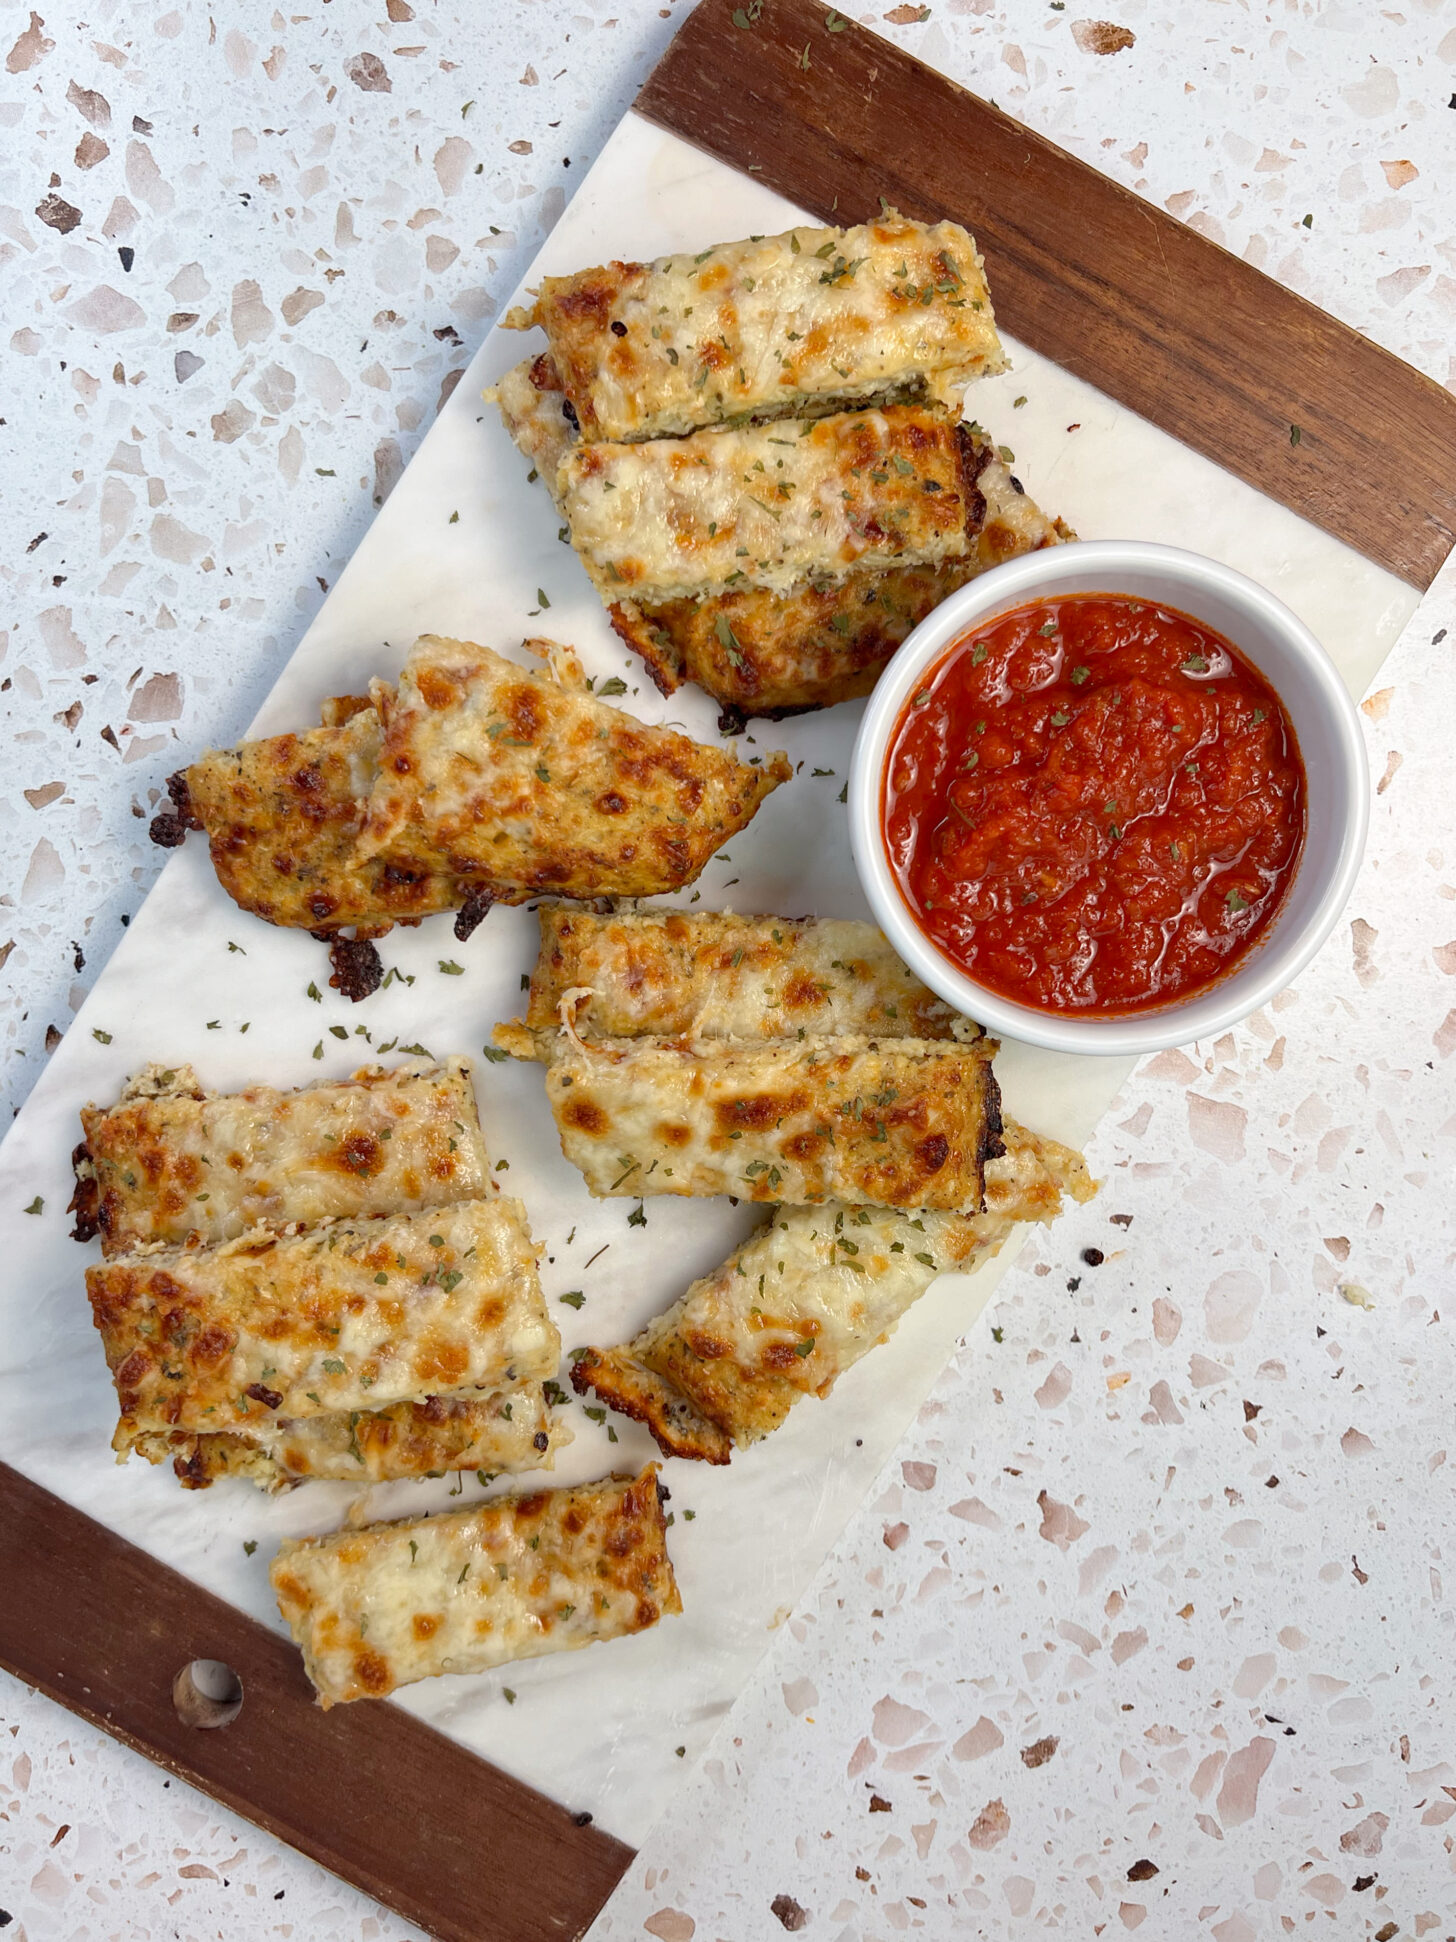
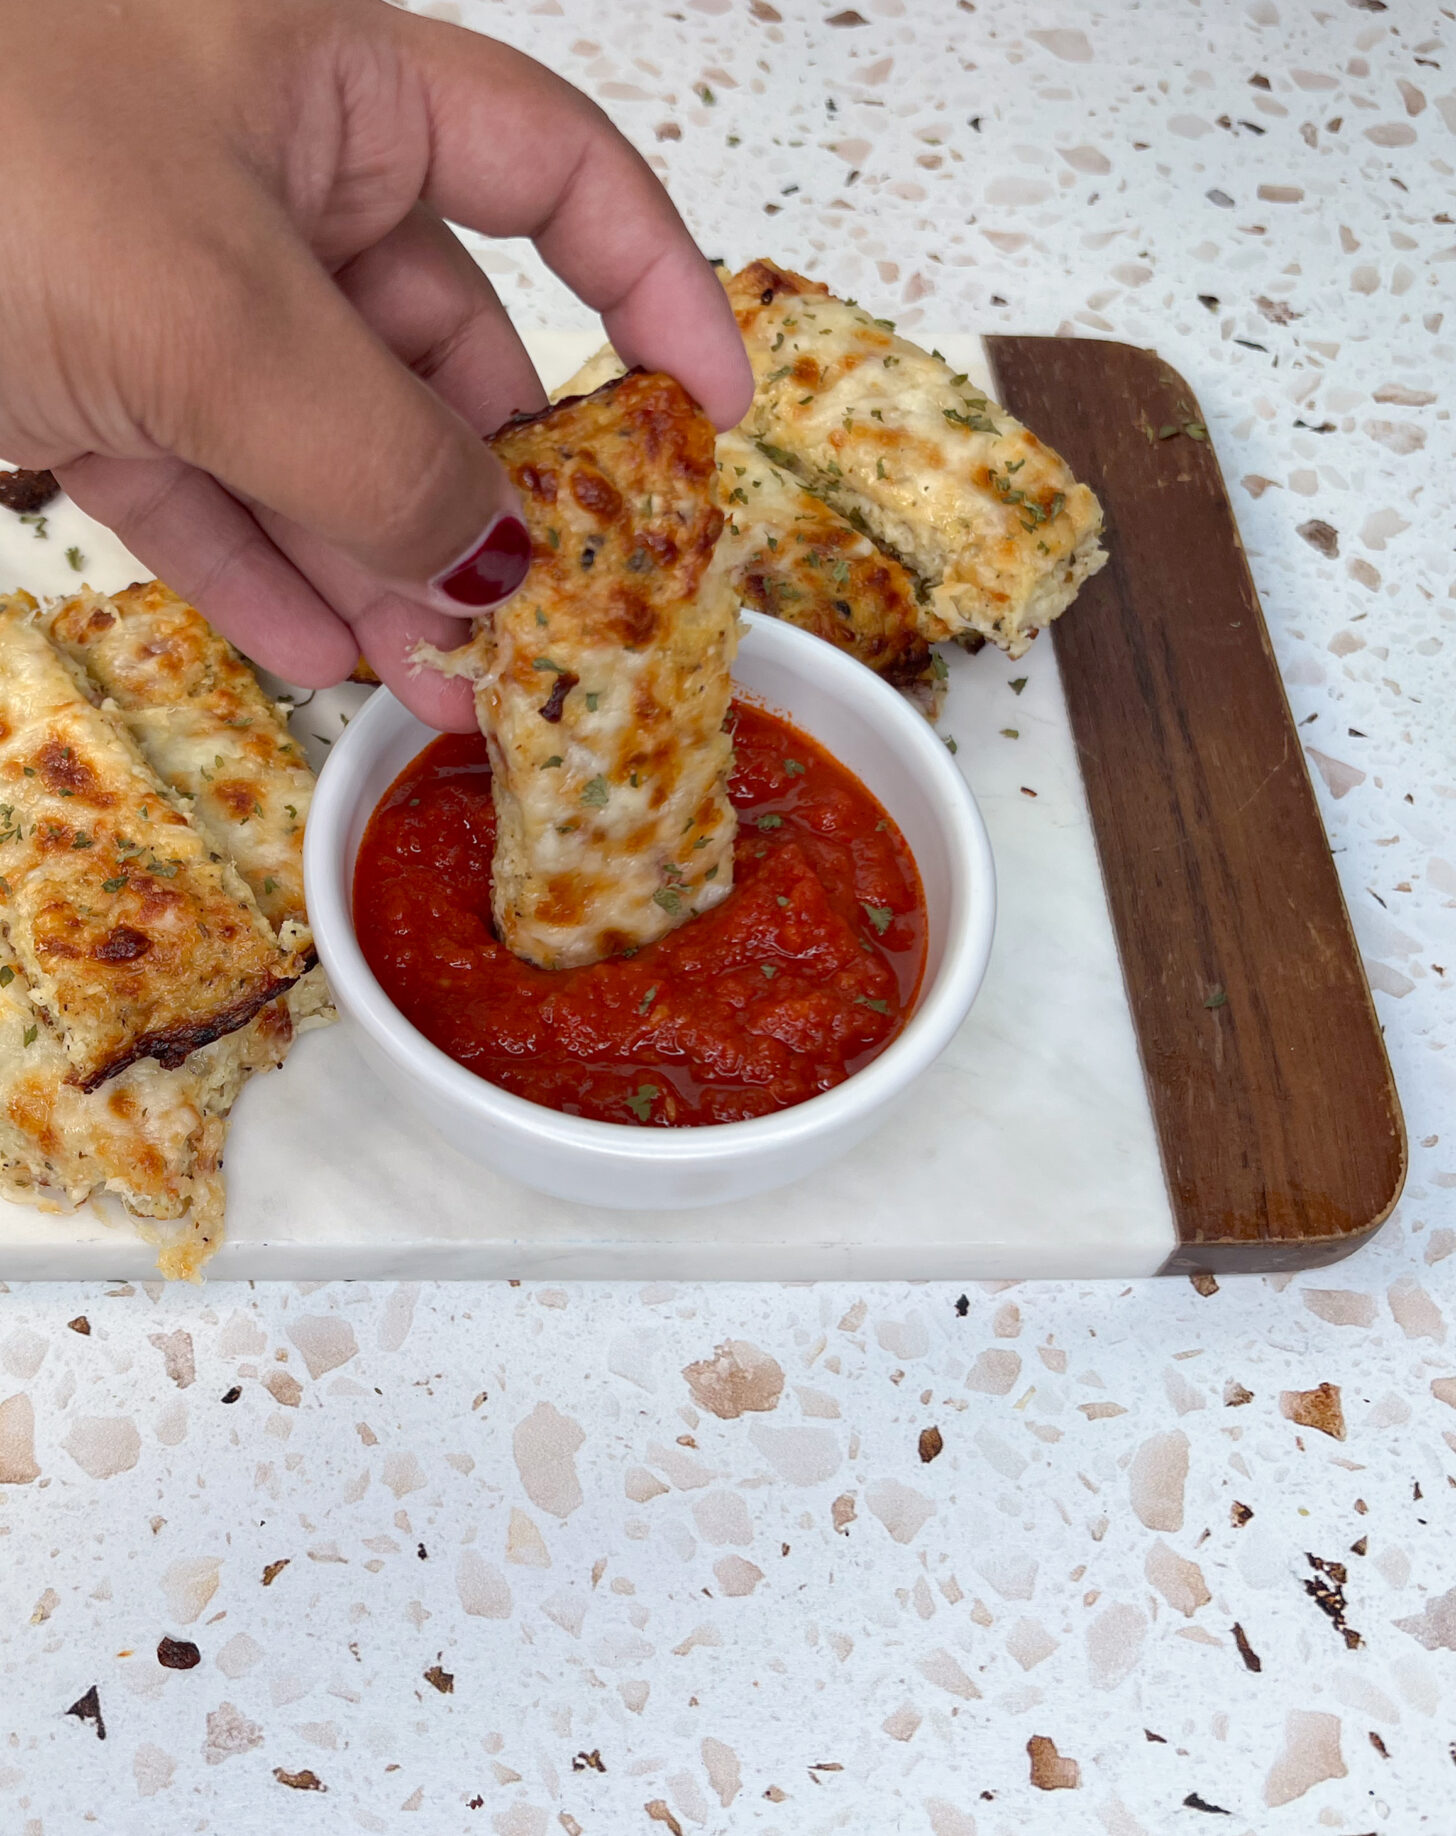
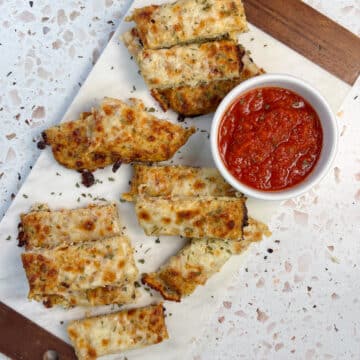
Easy and Cheesy Cauliflower Breadsticks (Gluten-Free)
These golden, garlicky cauliflower breadsticks are crispy on the outside, tender in the middle, and perfect for dipping in your favorite sauces. With just a handful of ingredients, you’ll be on your way to the perfect after-school or post-work snack.
Looking for a sweet treat after these cheesy breadsticks? I’ve rounded up 25 Naturally Gluten-Free Dessert recipes.
Why You’ll Love These Cauliflower Breadsticks
Make it what you want: Add a pinch of red pepper flakes for heat or swap in different cheeses if you want to get creative.
Hidden veggies: You’d never guess there’s an entire head of cauliflower in each batch. It disappears into the garlicky, cheesy, herby mix.
Gluten-free: No flour, no gluten, no problem. Perfect for those avoiding wheat.
Crispy and cheesy: Thanks to a good squeeze of moisture from the cauliflower and a golden cheesy topping, these breadsticks hit all the right textures.
Family-approved: Even kids who claim to “hate cauliflower” won’t see it coming.
Ingredients You’ll Need For Cauliflower Breadsticks
This recipe is surprisingly simple. You might already have everything on hand!
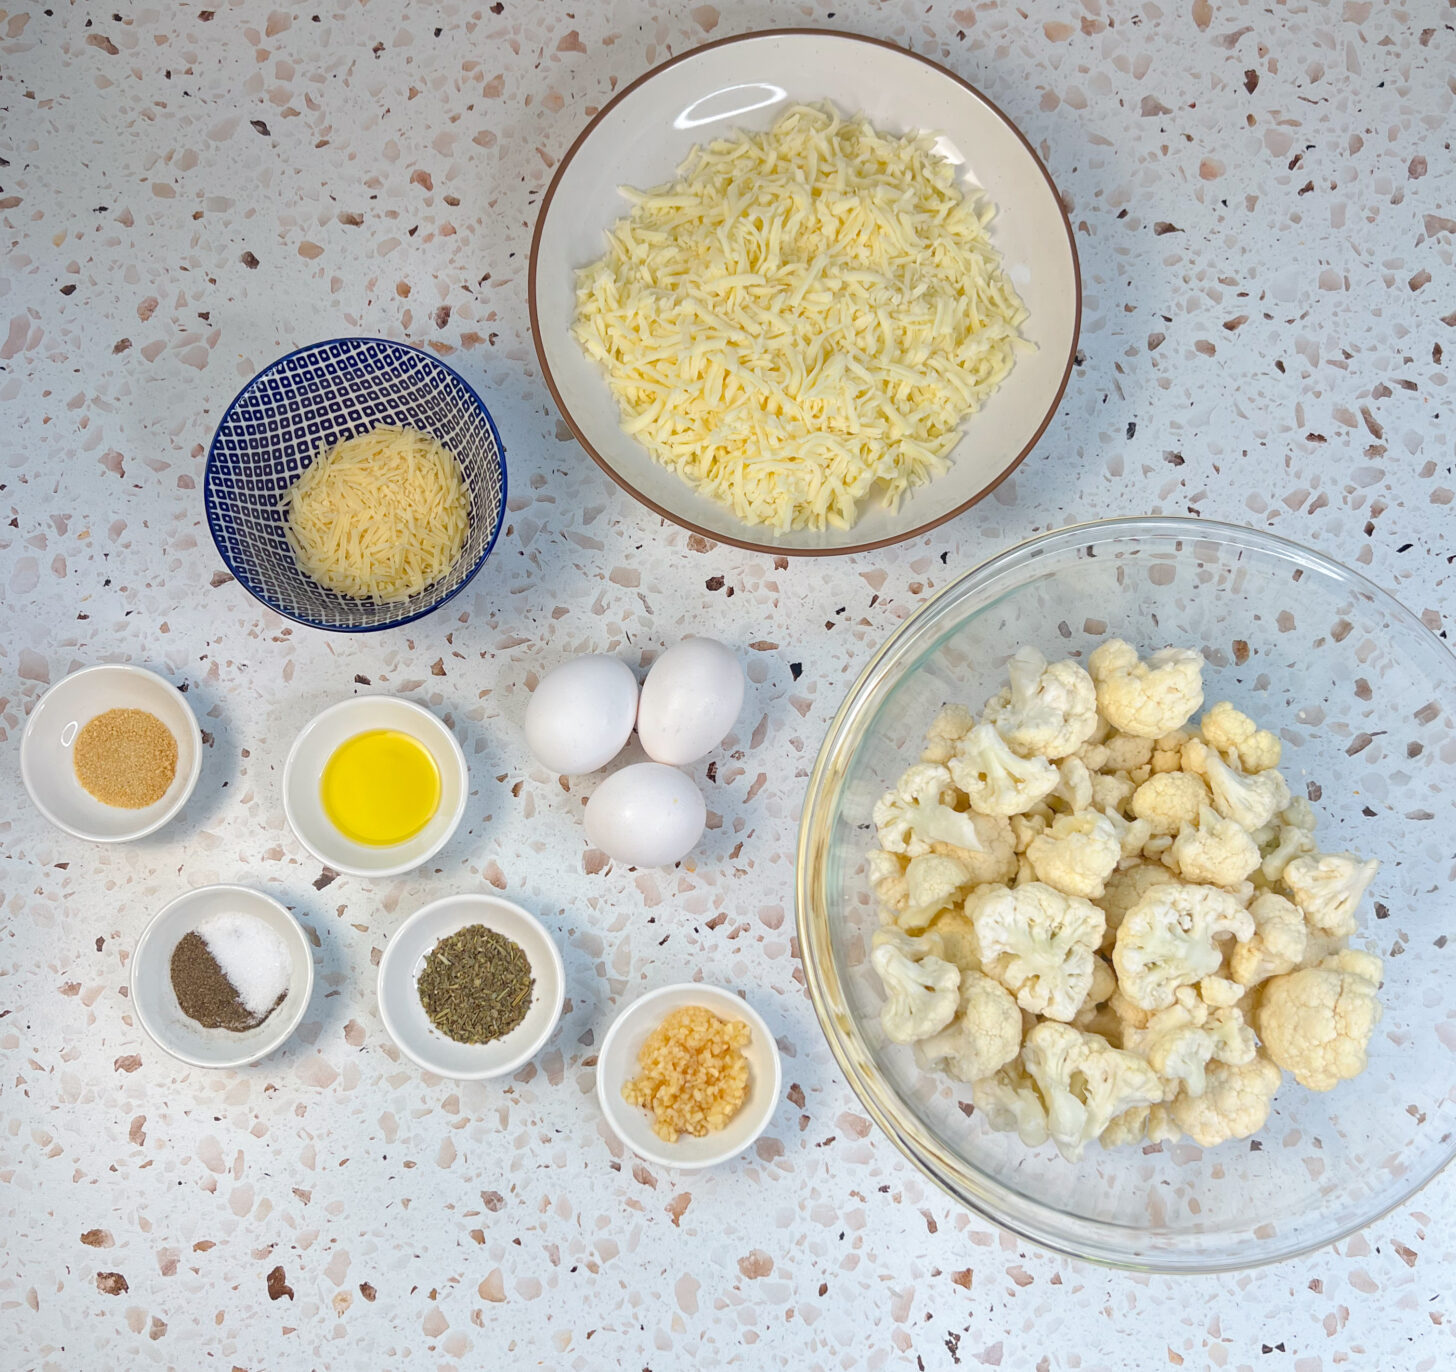
- Cauliflower – The star of the show. One large head yields about 4 cups when riced.
- Olive oil – Just a touch, used to sauté the garlic.
- Garlic – Fresh is best. It adds that signature savory flavor.
- Eggs – Help bind everything together.
- Italian herbs + onion powder – For extra flavor that compliments the cauliflower.
- Salt + pepper – Season to taste.
- Mozzarella cheese – Divided in the mixture and sprinkled on top for that gooey finish.
- Parmesan cheese – Adds a nutty, salty depth that pairs beautifully with the mozzarella.
Optional for dipping:
- Marinara sauce
- Ranch dressing
- Garlic butter
How to Prep Cauliflower Like a Pro
This step can make or break your breadsticks—literally.
The key to crispy cauliflower breadsticks is squeezing out every last drop of moisture from the riced cauliflower. Too much liquid, and you’ll end up with soggy sticks that fall apart.
Here’s how to do it right:
- Rice the cauliflower: Cut your head of cauliflower into florets and pulse in a food processor until it resembles rice. No food processor? A box grater works too.
- Cook the cauliflower: Either microwave it for 7–10 minutes (covered, in a glass bowl) or sauté in a skillet until soft.
- Cool slightly: Let it rest a few minutes so it’s not scalding hot.
- Squeeze, squeeze, squeeze: Transfer to a clean kitchen towel or cheesecloth and wring out all the moisture. Keep squeezing until you think there’s nothing left—then squeeze again.
This step alone is what turns your breadsticks from limp to crispy, so don’t rush it.
Watch The How-To Video
Step-by-Step Overview
Once the cauliflower is ready, everything comes together in a flash.
- Mix the dough: Combine your cooked cauliflower with garlic, eggs, herbs, cheese, and seasonings.
- Shape it: Line a baking sheet with parchment paper and press the mixture into a rectangle, about ½ inch thick.
- Bake it: Pop it in the oven at 400°F for 20–25 minutes, until the base is firm and golden.
- Add cheese and finish baking: Sprinkle more mozzarella on top and bake another 5–7 minutes until bubbly.
- Slice + serve: Let cool slightly before slicing into sticks.
Broil for 1–2 minutes at the end if you want extra crispy, golden cheese on top!
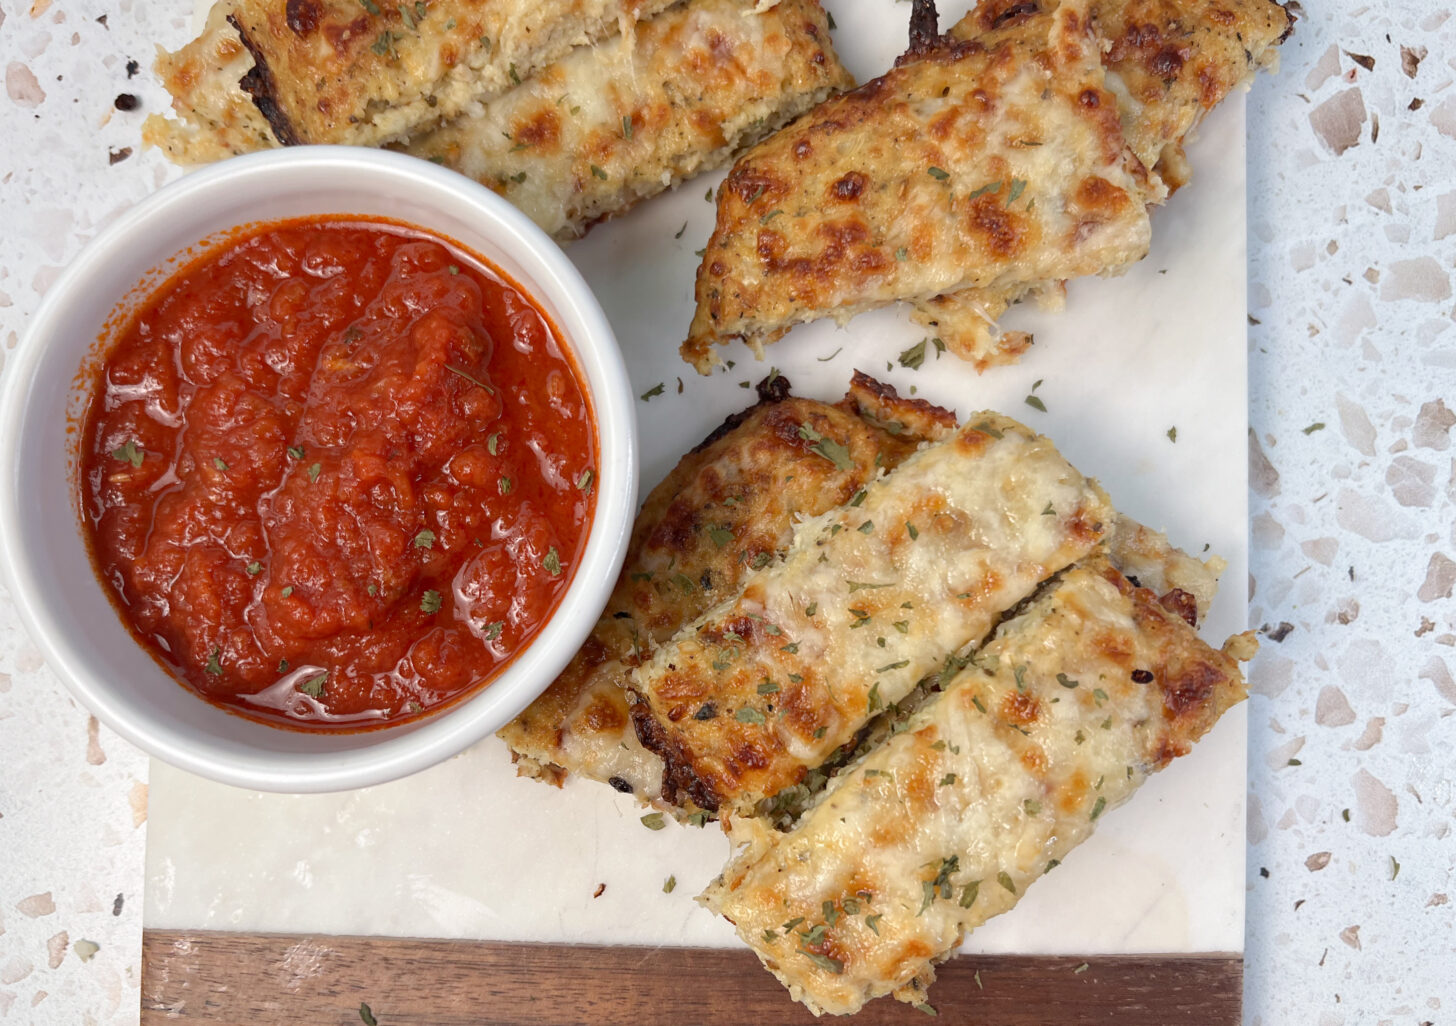
Dipping Sauces That Take These Cauliflower Breadsticks Over the Top
These cauliflower breadsticks are the perfect vehicle for your favorite sauces.
Here are a few no-fail options:
- Any of the recipes in this round-up of 15 sauces.
- A classic marinara – jarred or homemade!
- This creamy homemade ranch
- Garlic butter
Want to get fancy? Try a basil pesto or even a spicy chipotle aioli for a flavor twist.
How to Store Leftovers (If You Have Any)
Cauliflower breadsticks are best served hot from the oven, but they reheat very well.
Freezer: You can freeze the baked (and cooled) breadsticks. Reheat straight from frozen in the oven until warmed through and crisp.
Fridge: Store in an airtight container for up to 3 days.
Reheat: Use the oven or air fryer for best results. Skip the microwave—it’ll make them soft and soggy.
Make-Ahead Tips
You can make the cauliflower mixture and store it in the fridge for a few hours before shaping and baking. Just be sure to cover tightly so it doesn’t dry out.
This is a great option if you’re entertaining or making these for game day—get the messy part out of the way early so all that’s left is baking and serving hot.
Variations and Add-Ins
These breadsticks are delicious as-is, but don’t be afraid to switch things up based on your taste or what you have on hand.
Cheese swaps:
- Use sharp cheddar for more punch.
- Try pepper jack for a spicy kick.
- A sprinkle of feta or goat cheese can elevate the flavor profile.
Herb boosts:
- Add fresh basil, oregano, or parsley for a garden-fresh touch.
- Red pepper flakes or smoked paprika bring a bit of heat.
Protein upgrade:
- Add cooked crumbled bacon or sausage to the mix for a heartier snack.
Make it dairy-free:
Use a dairy-free cheese blend and plant-based Parmesan. Just check the melt factor—some vegan cheeses don’t melt quite the same.
The Hidden Veggie Win
One of the best parts about these cauliflower breadsticks? You’re sneaking in an entire veggie without anyone noticing.
This is a lifesaver for picky kids, reluctant veggie eaters, or anyone trying to boost their vegetable intake in a fun and satisfying way.
Cauliflower is packed with fiber, vitamin C, and antioxidants, but its mild flavor and fluffy texture make it the perfect chameleon in recipes like this. Once it’s mixed with cheese and garlic and baked to crispiness, the cauliflower completely disappears into the background.
You get all the nutrition, with none of the “ew, what’s that green thing?” drama.
What to Serve With Cauliflower Breadsticks
These pair well with just about anything—whether you’re serving them as an appetizer, a side dish, or a savory snack.
Here are some ideas:
- Soup or salad – Tomato basil soup, chicken noodle, or a crisp Caesar salad.
- Pasta night – Swap your usual garlic bread for these low-carb sticks.
- Game day spread – Serve with wings, sliders, or nachos.
- Pizza night – Make a double batch and serve with dipping sauces for a crowd-pleasing platter.
Cauliflower Breadsticks: Troubleshooting Tips
If it’s your first time making cauliflower breadsticks, here are a few things to watch out for:
They’re too soft or soggy.
- You likely didn’t squeeze out enough moisture. Be thorough—it makes a huge difference.
They fall apart.
- Make sure your eggs are fully mixed in and that the base is baked long enough before adding the last sprinkling of cheese over the top.
They burn on the edges.
- Check your oven temp and be sure the breadsticks aren’t too thin on the ends.
They’re bland.
- Don’t skip the herbs and seasonings! Cauliflower needs flavor support.
Other Recipes You’ll Love
Let Me Know How It Goes!
If you try making these Cauliflower Breadsticks or any other Suburban Simplicity recipe, don’t forget to rate the recipe and let me know how it went in the comments below, I love hearing from you! Better yet, use the hashtag #suburbansimplicity on Instagram.
Hungry for more? Follow Suburban Simplicity on Facebook, Instagram, YouTube, and Pinterest to see more DIYs, recipes, and home tips!
Also, don’t forget to sign up for email!
I only send one email a week, and it’ll include my latest recipes, DIYs, and tips, information about exclusive “email only” giveaways, and more! See form below!
Want to subscribe to the Suburban Simplicity Recipe Club? It’s only $5 per month, and you’ll get ad-free PDFs of any new recipes that I post while supporting me at the same time! Join the club, here.
Gluten-Free Cheesy Cauliflower Breadsticks
Ingredients
- 1 large cauliflower, about 4 cups, riced
- 1 teaspoon extra virgin olive oil
- 4 cloves garlic, minced
- 3 eggs, beaten
- 1 teaspoon Italian herbs
- ½ teaspoon onion powder
- 1 teaspoon salt and pepper to taste
- 2 cups shredded mozzarella, divided
- ¼ cup Parmesan cheese
Dipping Sauce Options:
- Marinara Sauce
- Ranch Dressing
- Garlic butter sauce
Equipment
- skillet
Instructions
- Prep the cauliflower: Preheat oven to 400°F (200°C). Cut cauliflower into florets and pulse in a food processor to rice it (or keep it whole and use a grater). Place in a glass bowl with a lid and microwave riced cauliflower for about 7-10 minutes, or sauté in a skillet until tender. Let cool slightly, then place in a clean kitchen towel or cheesecloth and squeeze out as much liquid as possible. This is key for firm breadsticks!
- Cook garlic: In a small skillet, heat olive oil over medium-low heat. Add minced garlic and cook 30 seconds to 1 minute until fragrant (don’t let it burn!).
- Make the mixture: In a large bowl, combine cauliflower, cooked garlic, beaten eggs, Italian herbs, onion powder, salt, pepper, 1 cup mozzarella, and Parmesan. Mix until well combined.
- Shape and bake: Line a baking sheet with parchment paper. Spread mixture into a rectangle, about ½ inch thick. Bake for 20–25 minutes, until set and lightly golden.
- Add cheese + finish baking: Sprinkle remaining 1 cup mozzarella over the top. Bake another 5–7 minutes, until cheese is melted and bubbly.
- Slice + serve: Let cool slightly, then slice into breadstick shapes. Serve warm with a yummy dipping sauce.
Notes
- Really squeeze out that cauliflower! Too much moisture = soggy breadsticks.
- If you want the breadsticks crispier, after baking, broil for 1–2 minutes to brown the cheese on top.
- Store in the fridge up to 3 days and reheat in the oven or air fryer for best texture.
- Make ahead: The cauliflower mixture can be prepped and refrigerated a few hours before baking.


Hello, have you tried making this into a pizza crust? If you did, did you double it and make it the same? I really, really, really want a decent gf pizza…
Hi Carrie! Actually, this one batch is enough for a pizza crust for 2 people in my opinion. My best advice is to squeeze as much of the moisture from the cauliflower as possible after microwaving it. Don’t skip this part! I would follow the instructions exactly the same. Before you sprinkle the last half of the cheese, I’d spread the sauce and remainder of the cheese / toppings and bake for 5-7 min. Please do let me know how it turns out!